 中介服務 AdMob廣告
SDK導入說明
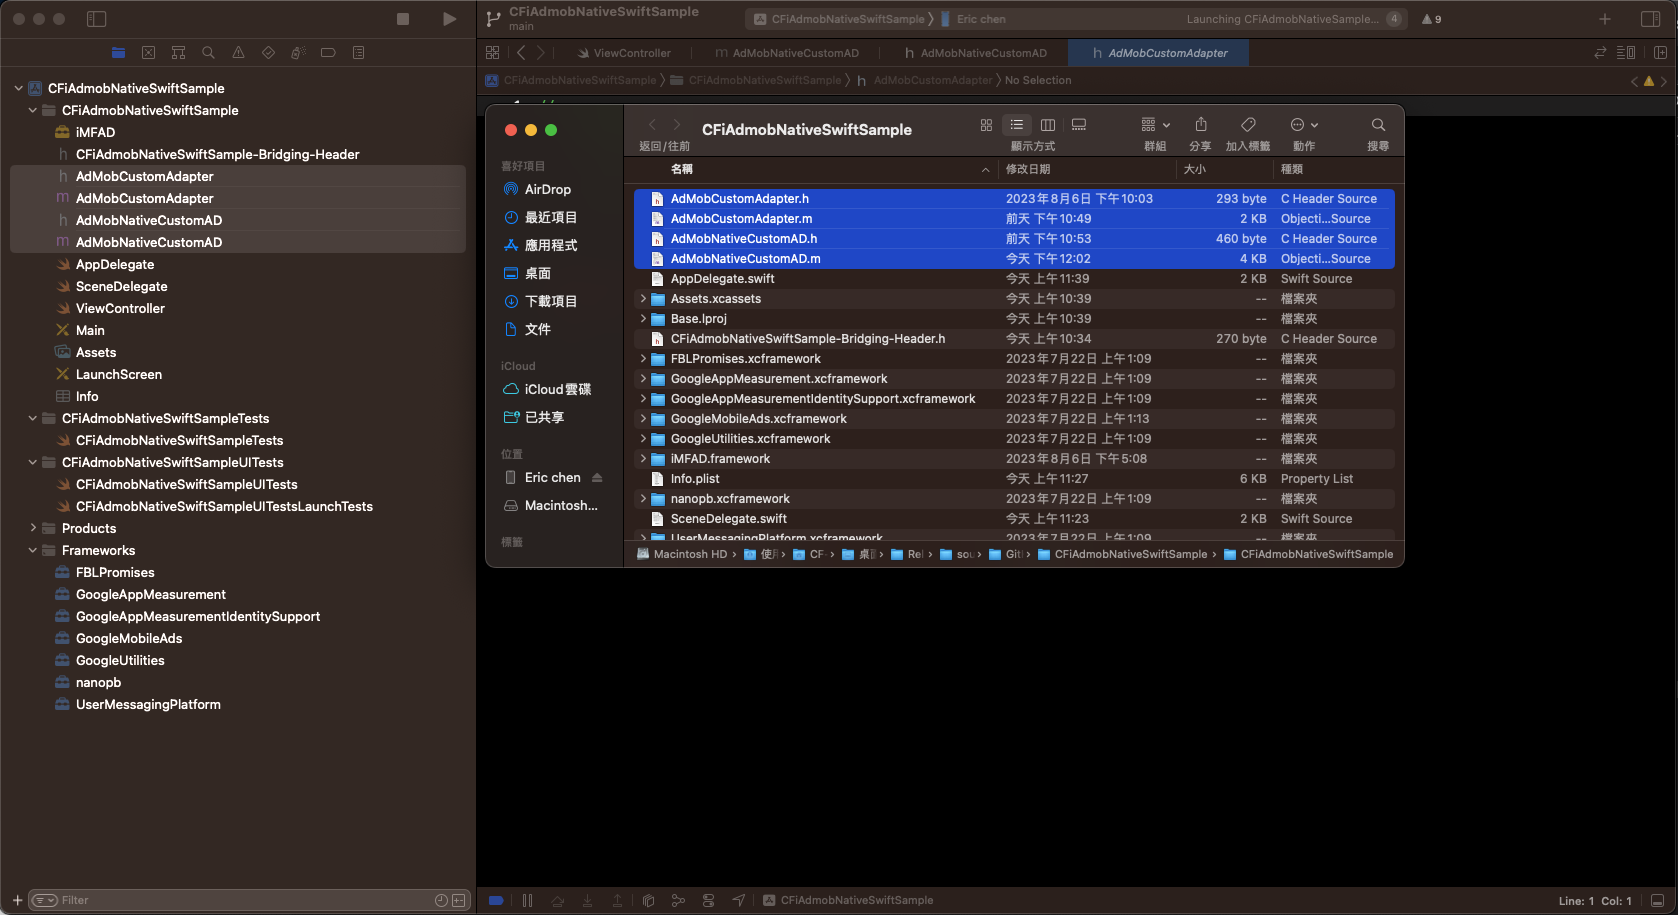
須先行下載頁面上的AdMob中介服務分類好的SDK檔案後,即進行解壓縮程序,Banner、Interstitial及Native 三種類型目錄夾內有必須使用的自定義Class檔案及一個iMFAD Framework及一個GoogleMobileAds framework,並完成以下三項前置步驟:
A.在本專案中加入 iMFAD Framework
B.設定廣告形式所需要檔案
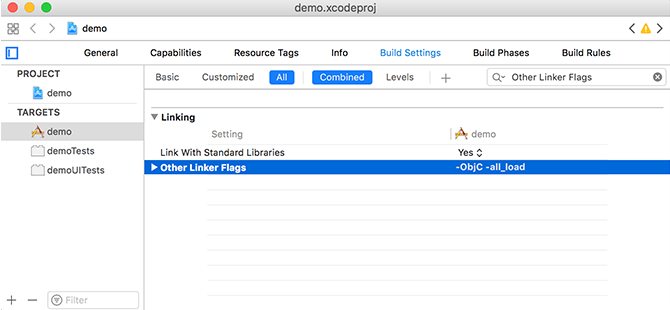
C.在 Build Settings 內 Other Linker Flags 請填入 -all_load 與 -ObjC
基本設定
iMFAD Framework 加入方式
Step1:
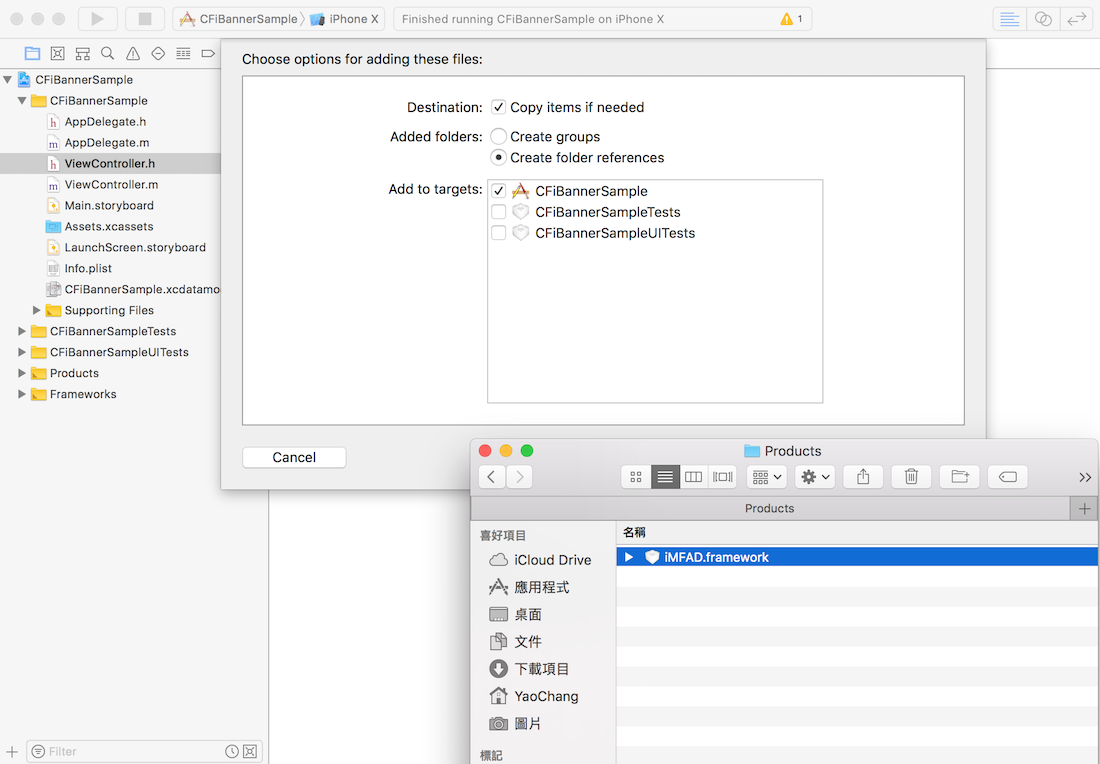
將 iMFAD.framework 拖曳到 XCode 中您的應用程式目錄內。選擇「Copy Items if needed」(複製必要項目),然後點擊「Finish」(完成)
Step2:
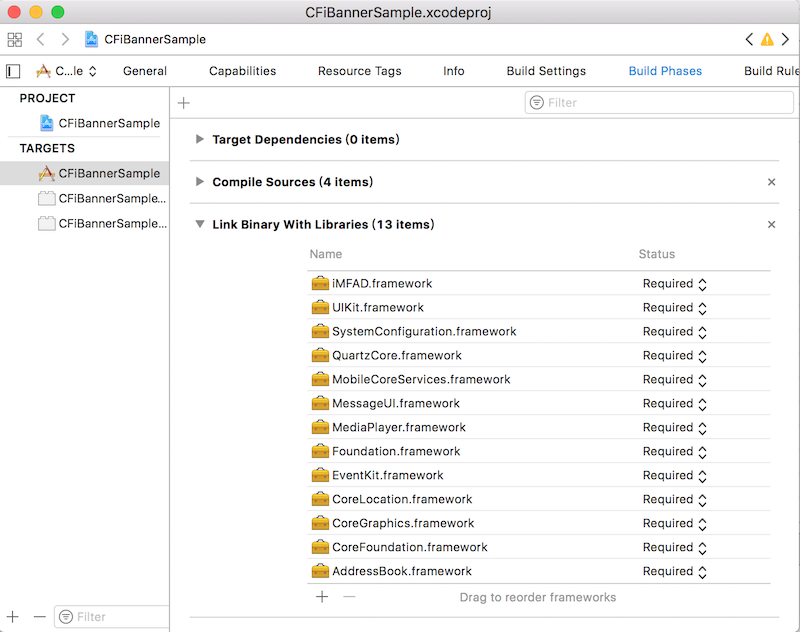
在TARGETS-開啟 Build Phases 分頁下的 Link Binary With Libraries 下拉式選單,
然後用畫面上出現的 +按鈕加入 剛剛拖拉至專案中的iMFAD.framework 。
新增橋接檔案
必須先新增橋接檔案,而該檔案須遵守既定的命名規則。
ProjectName + -Bridging-Header = ProjectName-Bridging-Header.h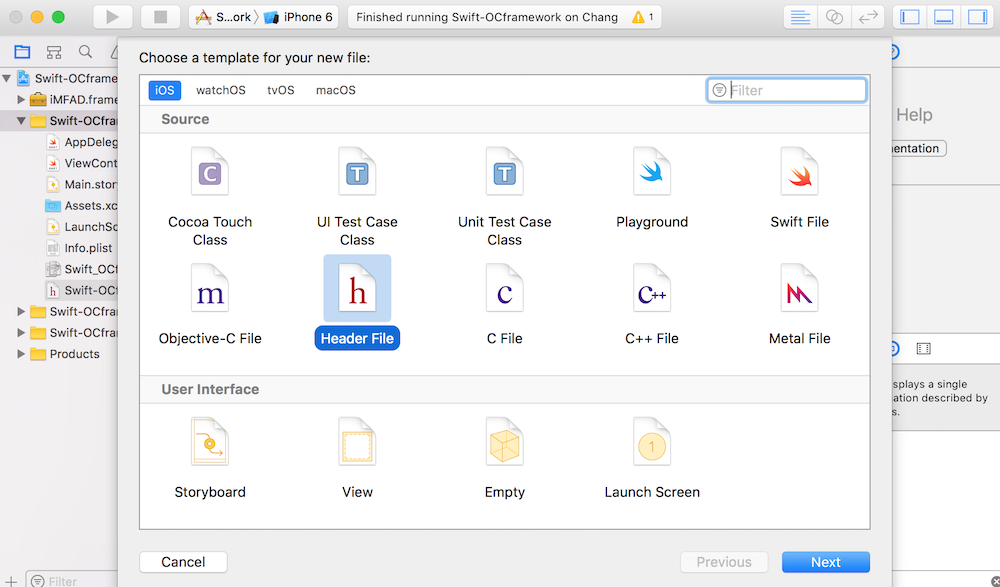
設定橋接檔案
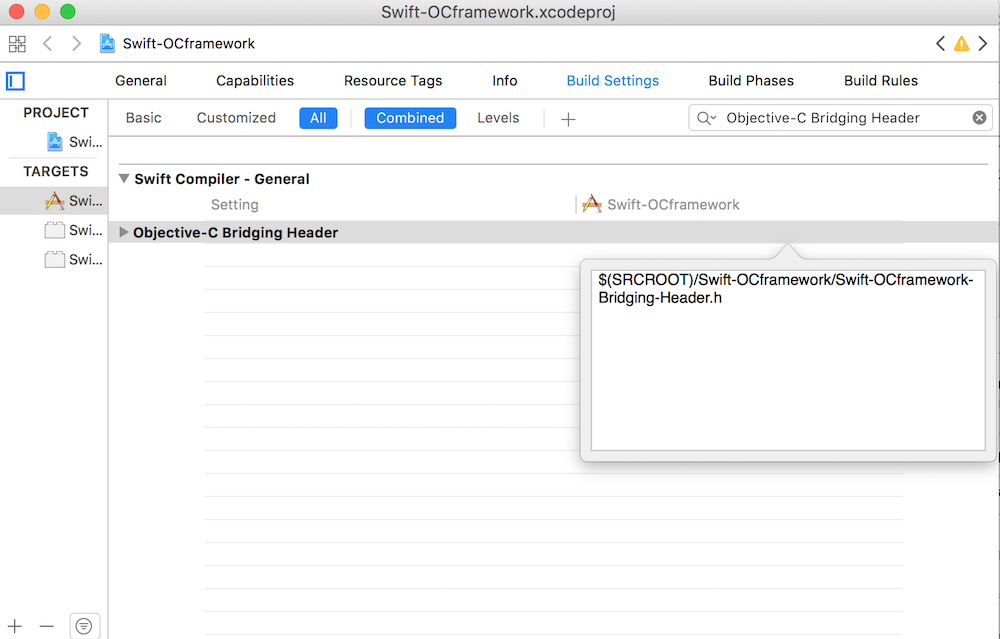
在專案設定選項中的 Build Settings下的Objective-C Bridging Header 加入橋接檔案的路徑
e.g. 我的專案名稱為 Swift-OCframework
$(SRCROOT)/Swift-OCframework/Swift-OCframework-Bridging-Header.h
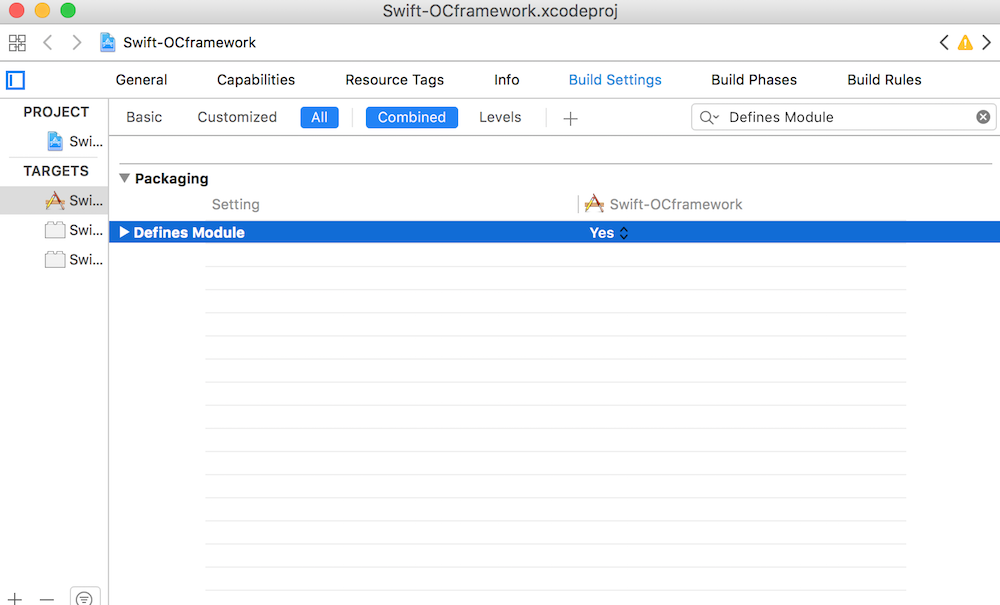
在專案設定選項中的 Build Settings下的Defines Module 設定為Yes
import
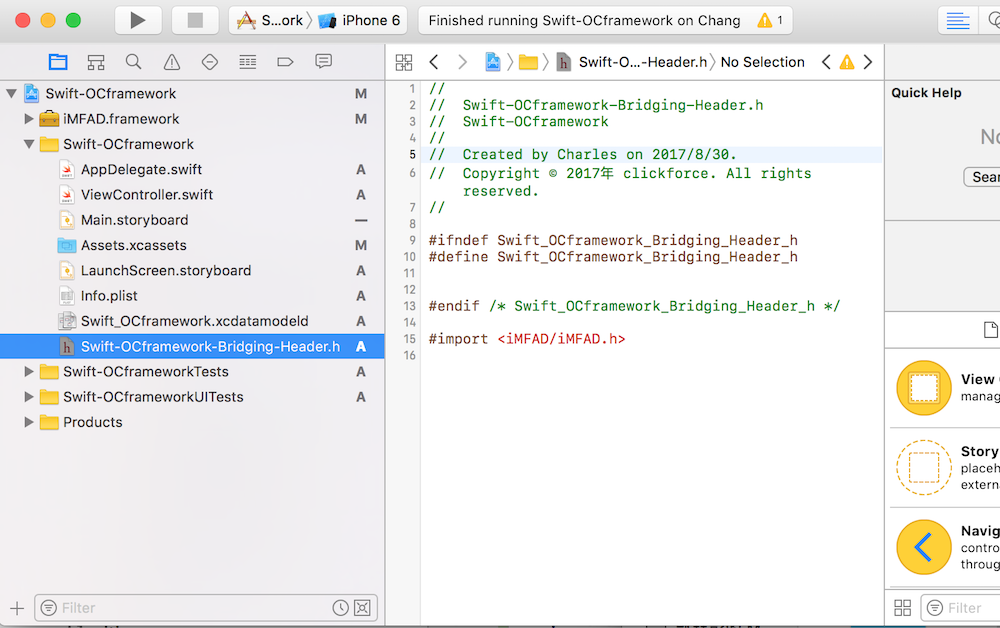
在橋接檔案中,import iMFAD.framework 。
#import <iMFAD/iMFAD.h>
GoogleMobileAdsSdk 設定
修改Build Settings
在專案設定選項中的 Build Settings下的 Other Linker Flags 加入-ObjC 、 -all_load
修改info.plist
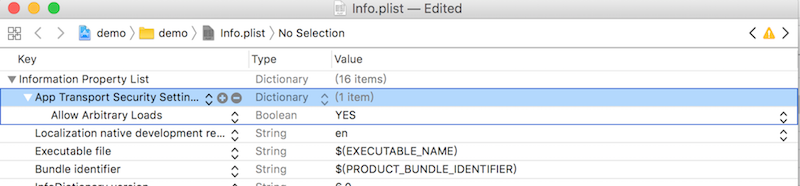
iOS9 App Transport Security Settings
NSAllowsArbitraryLoads 規則並設定為允許。請在 info.plist 中加入以下規則。1.加入步驟為 新增App Transport Security Settings , 並在底下新增Allow Arbitrary Loads ,將其設為 YES
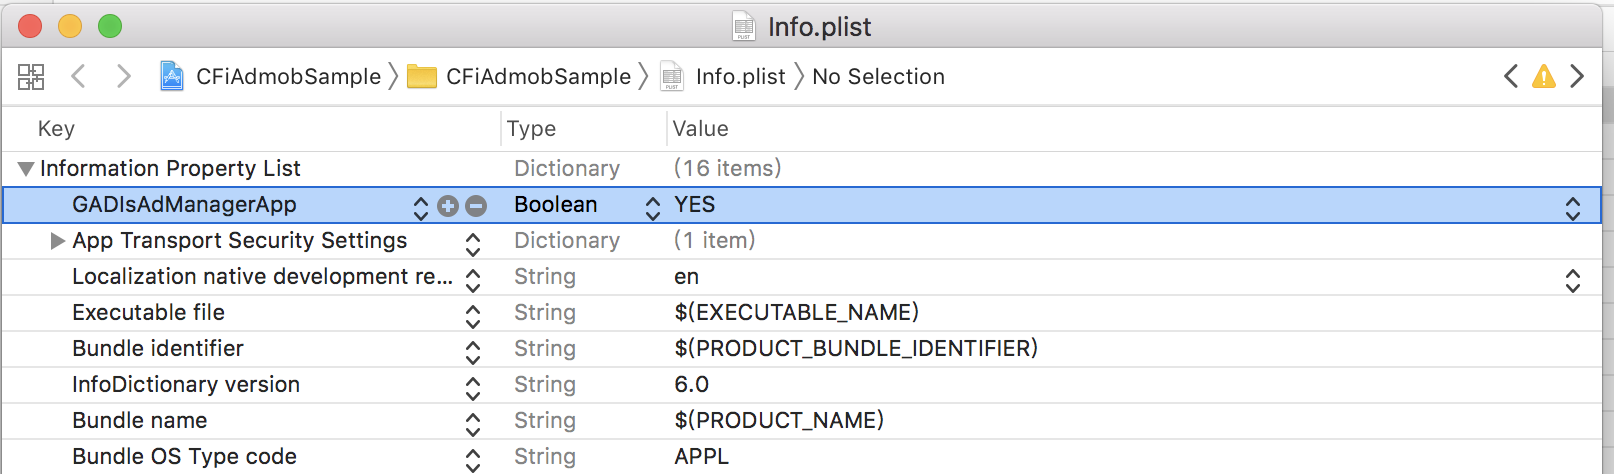
AdMob GADIsAdManagerApp
version 7.42.0 後版本都需要在 Info.plist 添加 GADIsAdManagerApp 並設定為允許。1.加入步驟為 新增GADIsAdManagerApp ,Type 選擇 Boolean,將其設為 YES
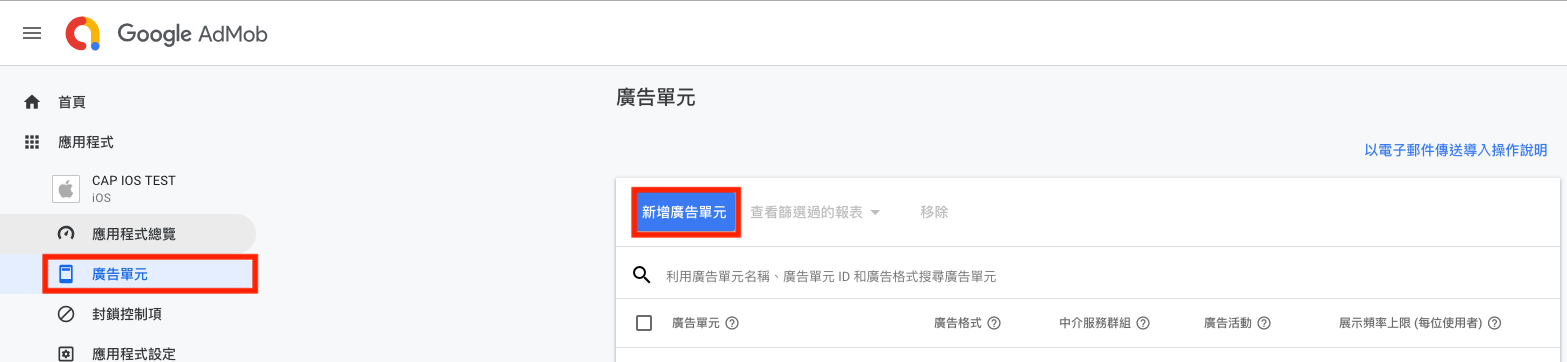
AdMob 設定
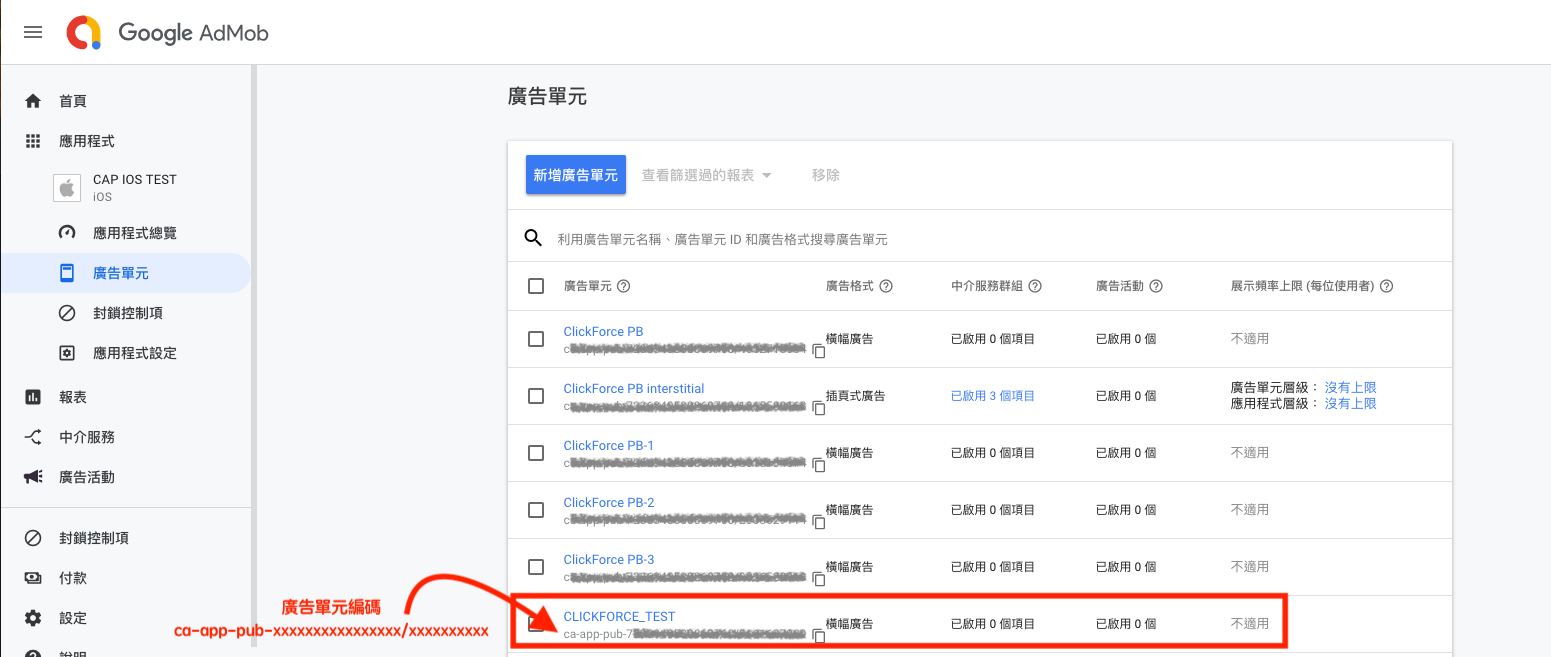
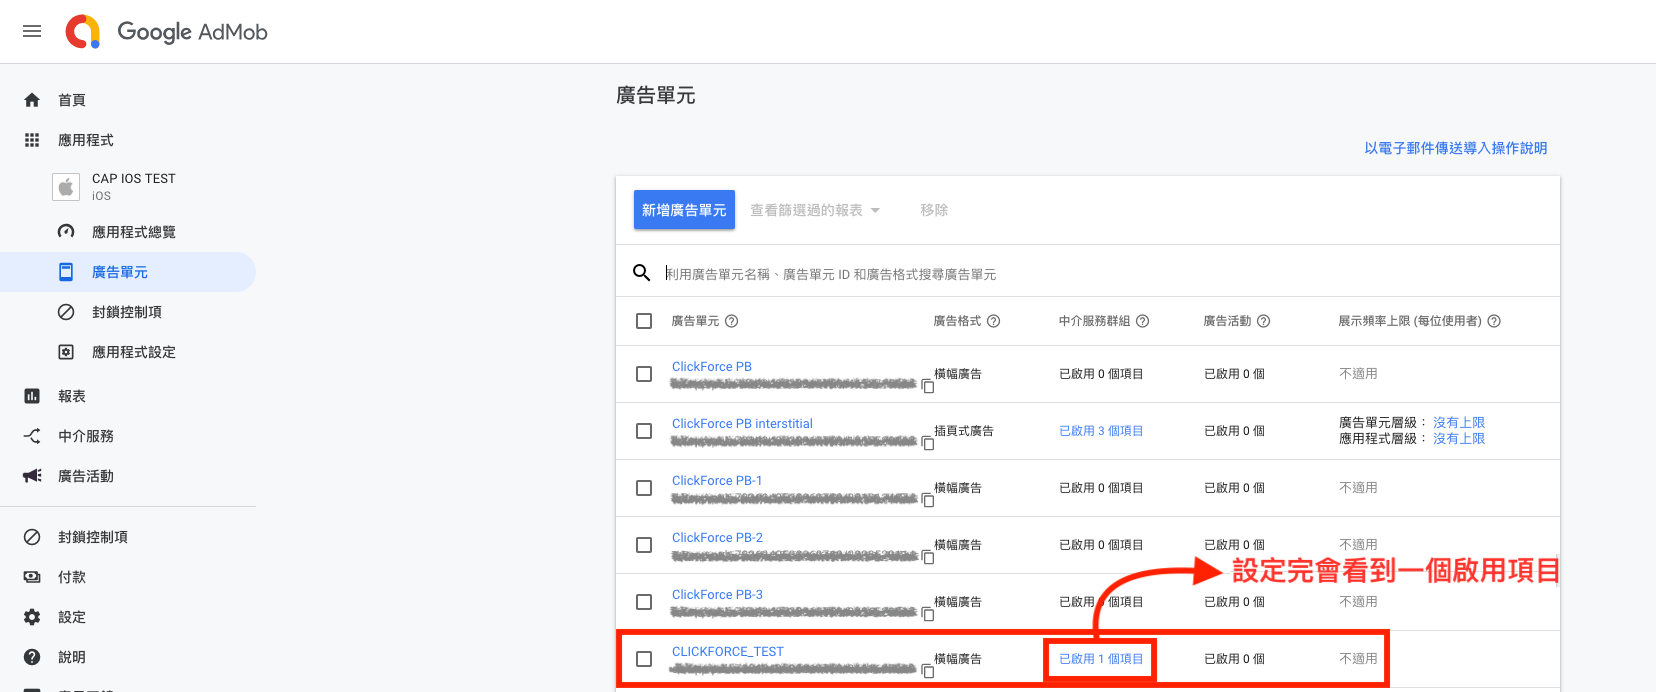
前往AdMob網站設定應用程式。新增完應用程式後,並記下你的廣告單元編號再從中介服務新增廣告來源,如下圖:
首先建立廣告單元:
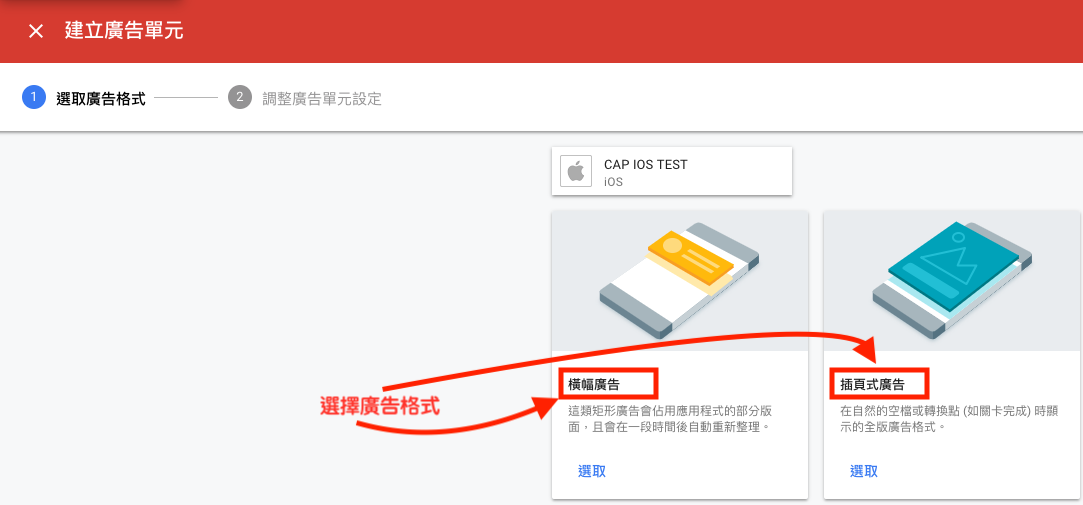
選擇廣告單元廣告格式:
編輯廣告單元名稱:
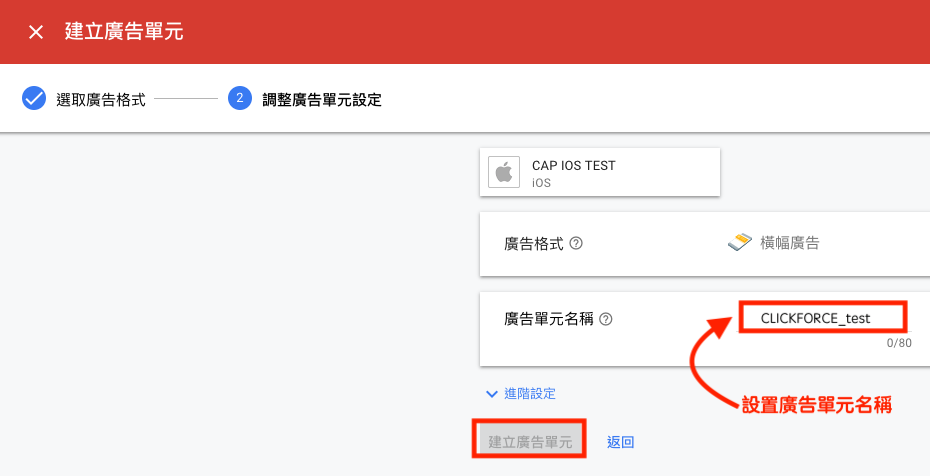
建立完成廣告單元:
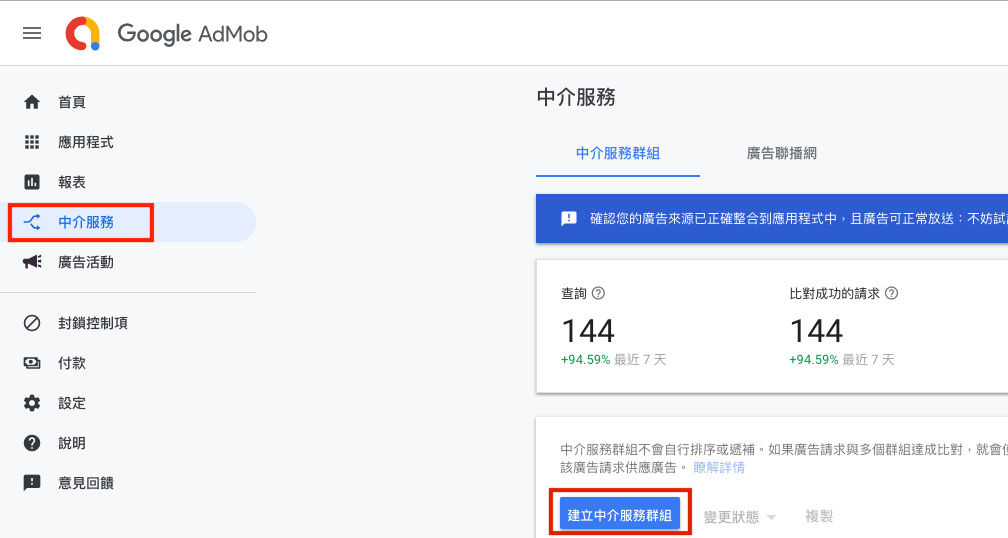
建立中介服務群:
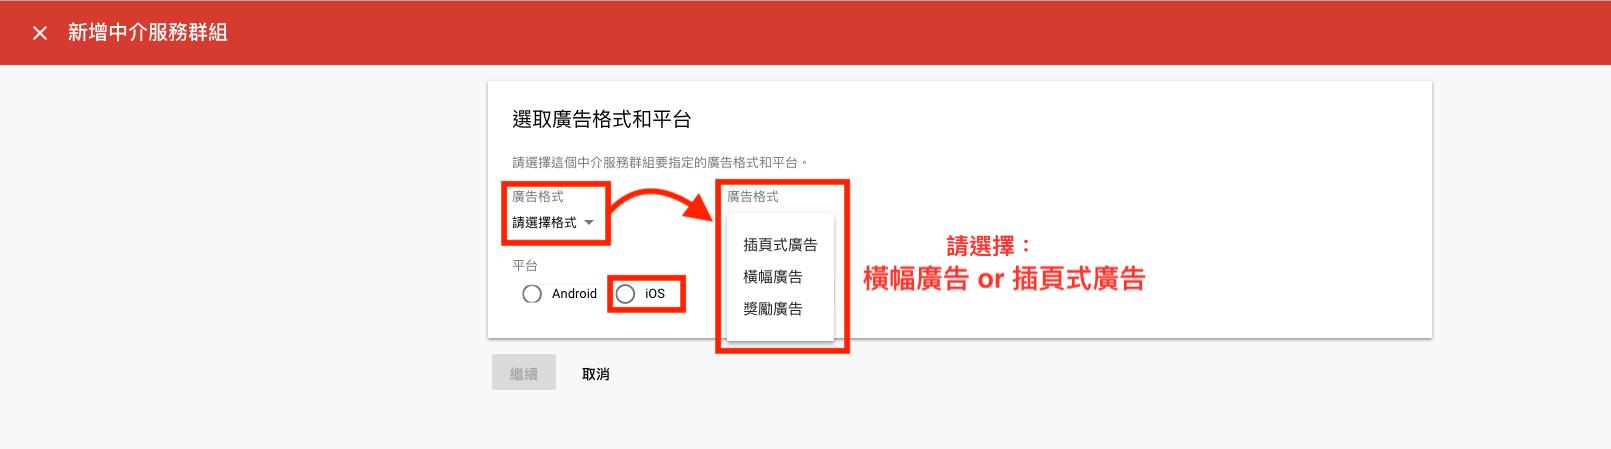
建立廣告格式跟平台:
建立地區跟建立廣告單元:
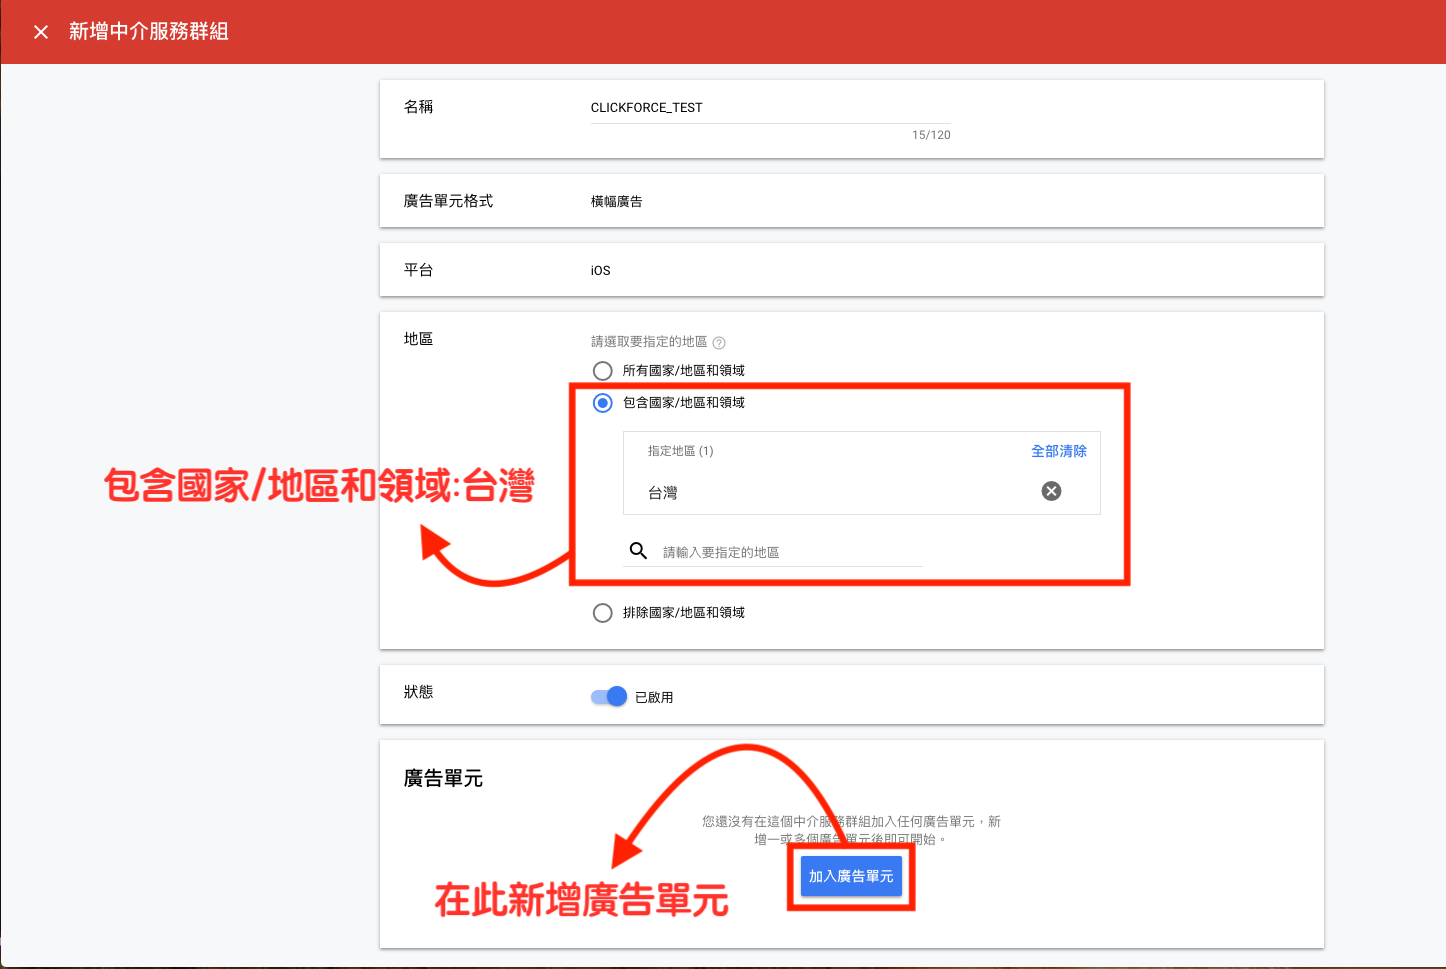
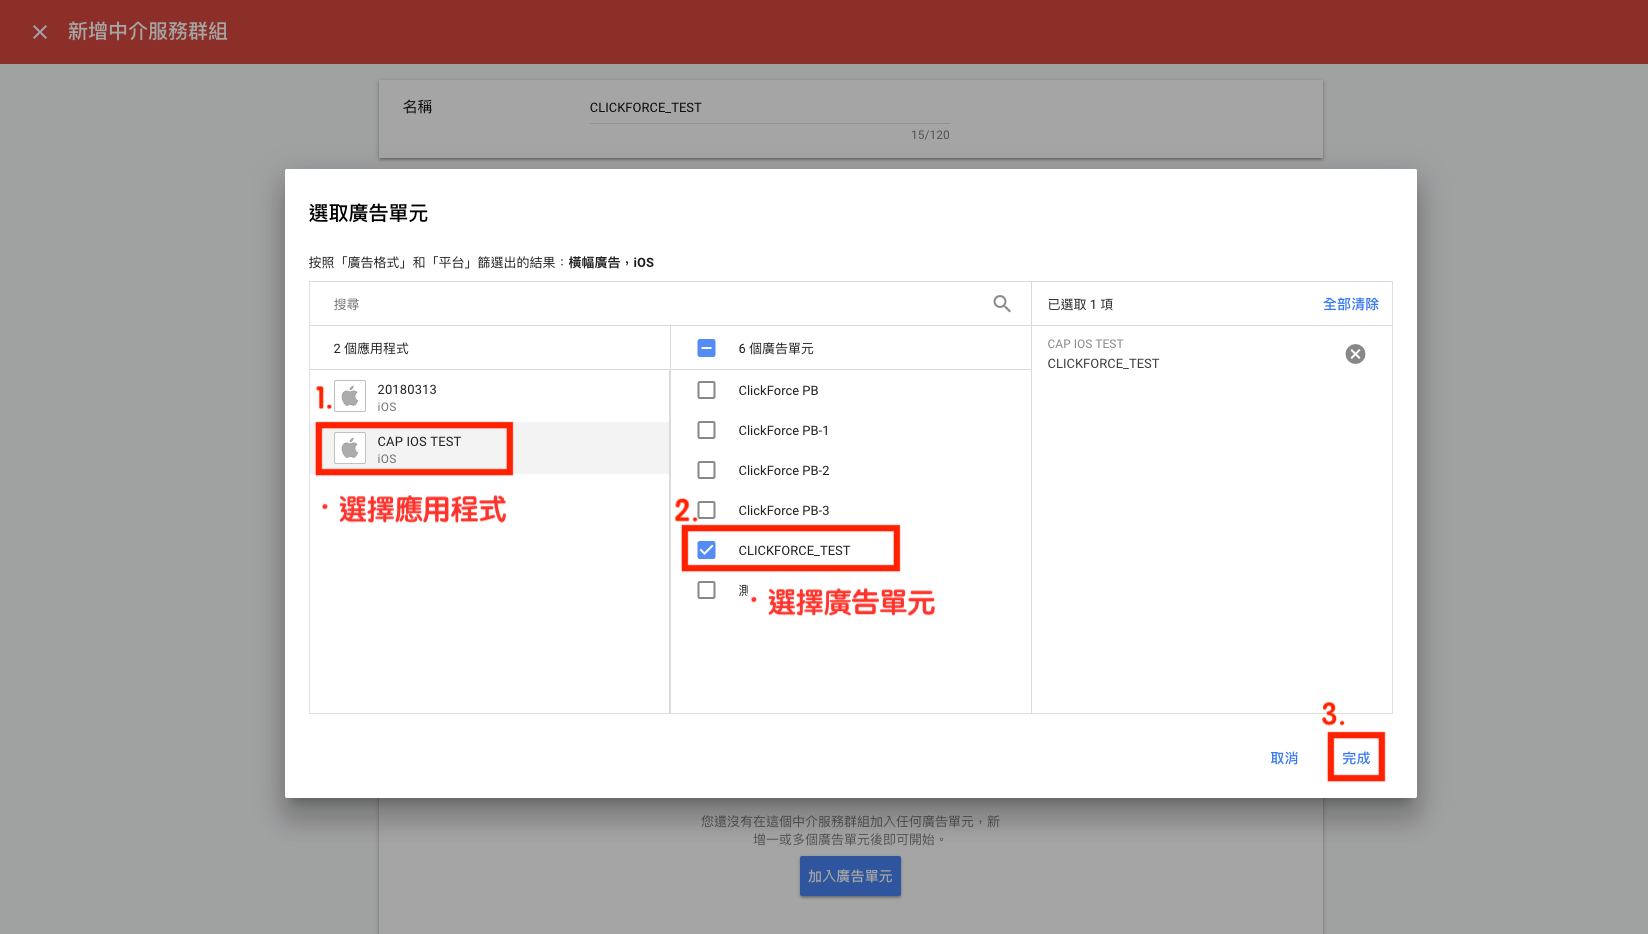
廣告單元設置:
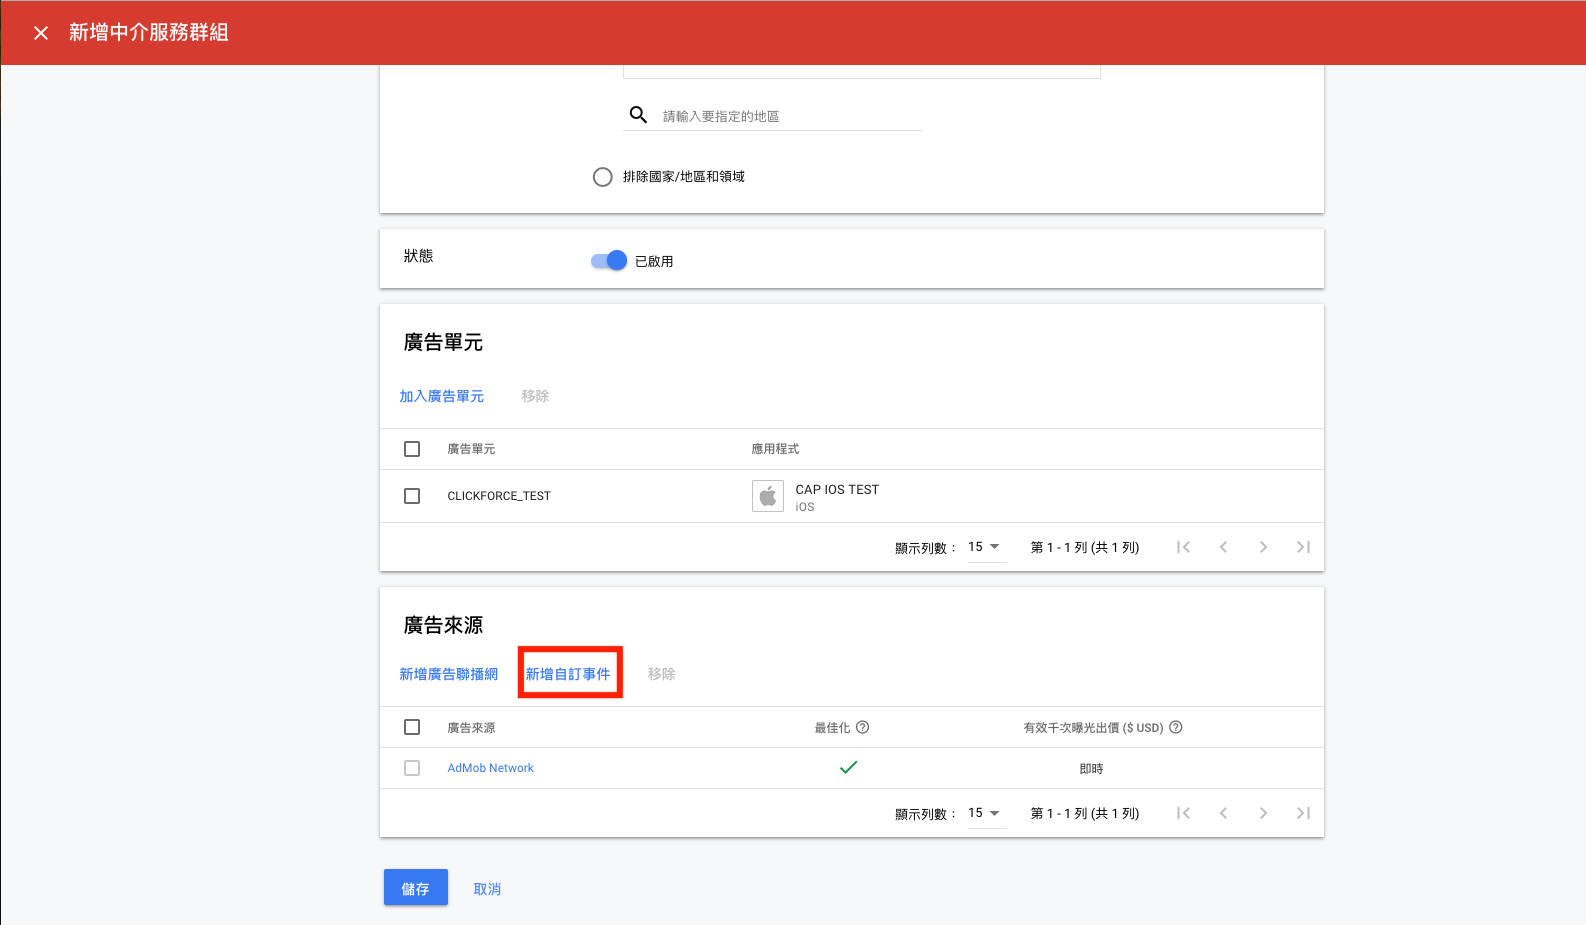
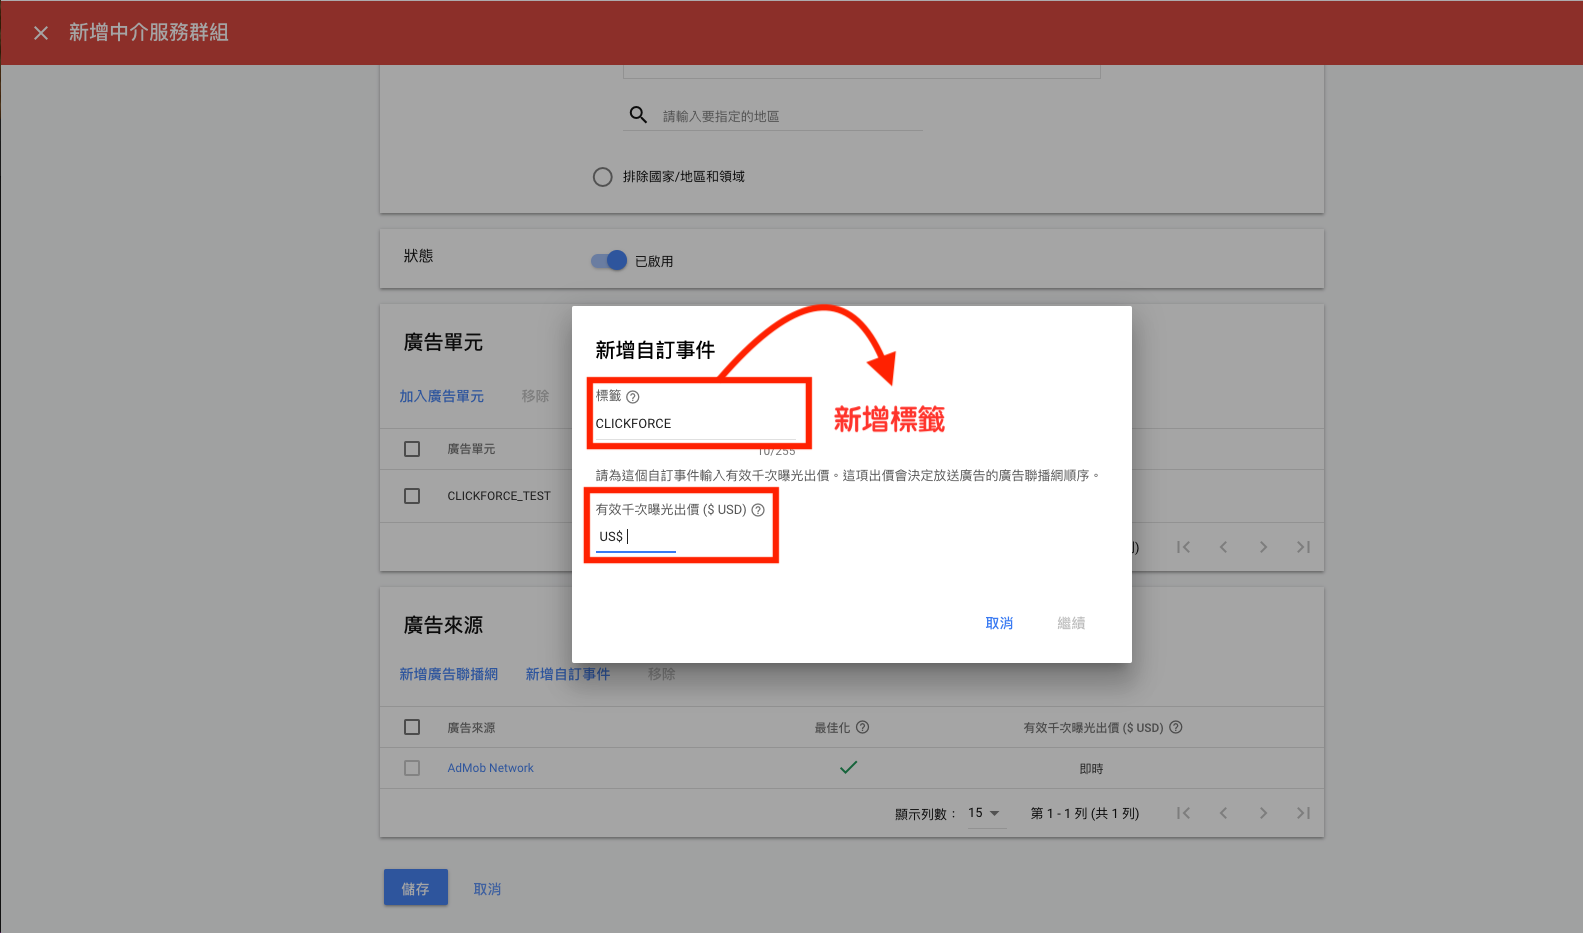
新增自訂事件:
自訂事件設定:
設定自訂廣告單元: (Class Name and Parameter)
-
Class Name- 填入 ClassName
(ClassName為SDK.zip裡提供的AdMobCustomAdapteror AdMobInterstitialCustomAD File Name) -
Parameter- 填入版位號(域動廣告版位)
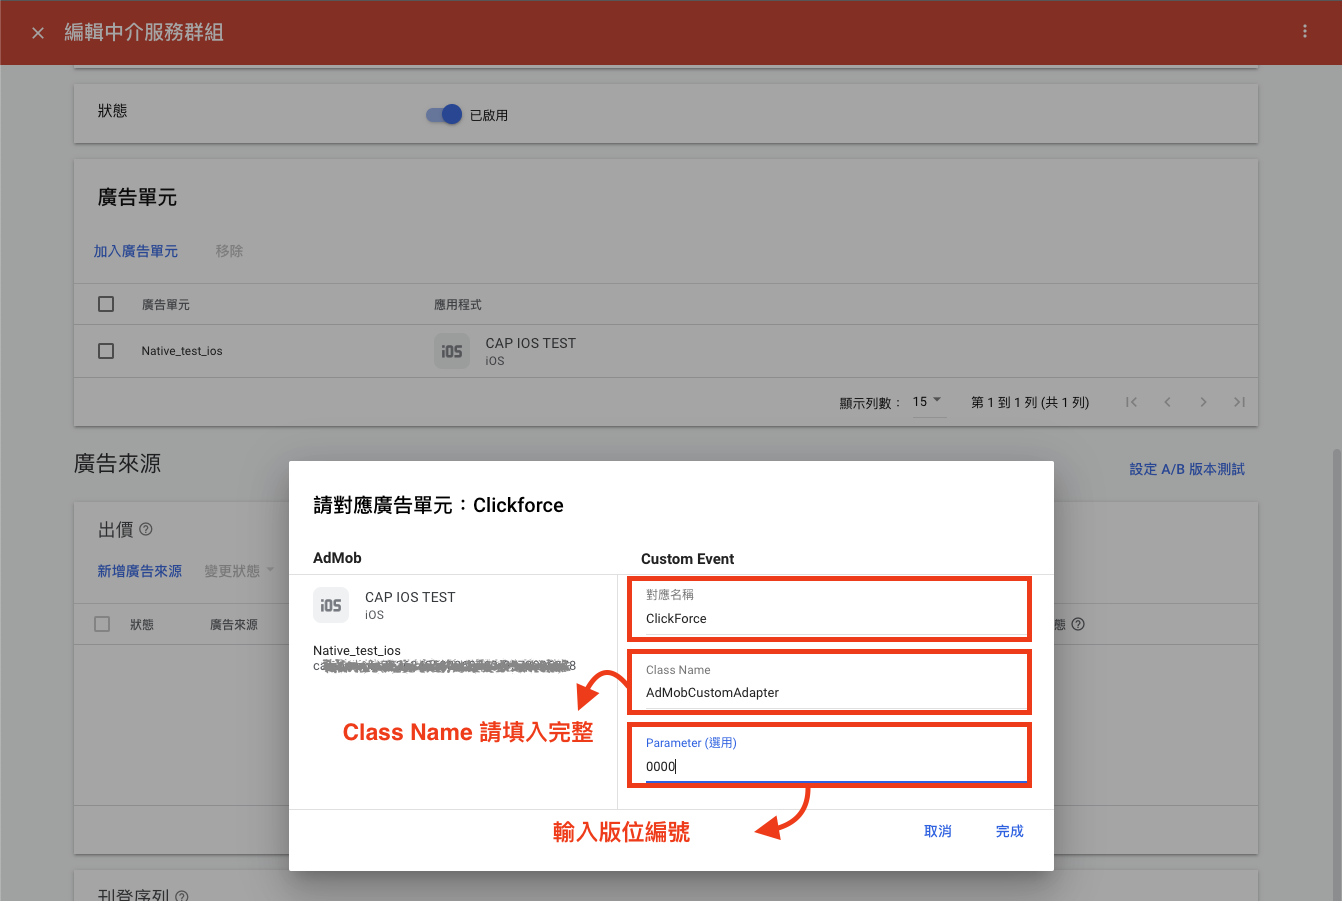
完成:
ClickForce AD 設定
宣告及引入
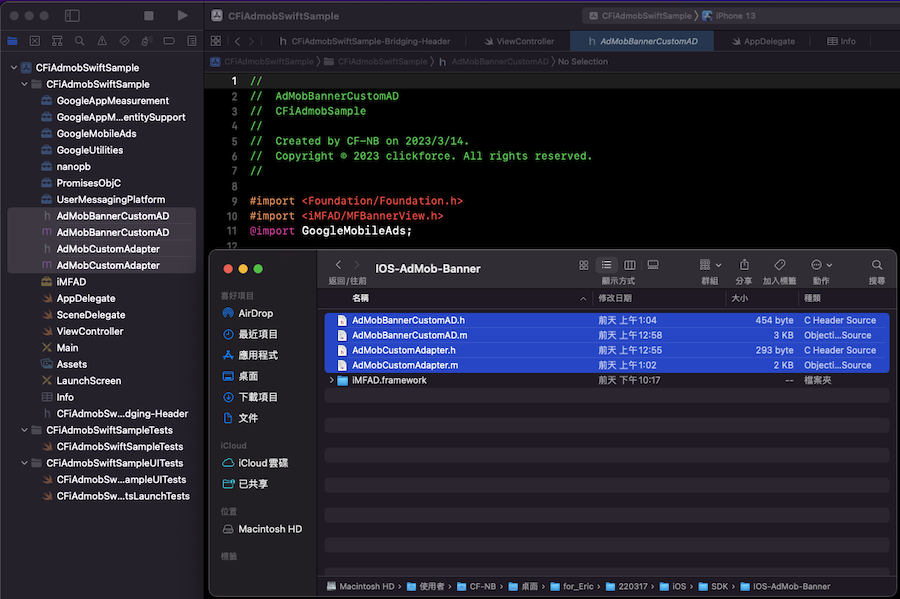
1.依照在AdMob平台上所設定的Class 名稱,將該同名Class引入至專案。 (該Class在IOS-AdMob-Banner壓縮包中)
2.加入程式碼
請在需要引入廣告的地方加入import GoogleMobileAds ,並加入GADBannerViewDelegate
import UIKit
import GoogleMobileAds

class ViewController: UIViewController {

    override func viewDidLoad() {
        super.viewDidLoad()
        // Do any additional setup after loading the view.

    }
}

extension ViewController:GADBannerViewDelegate{

}
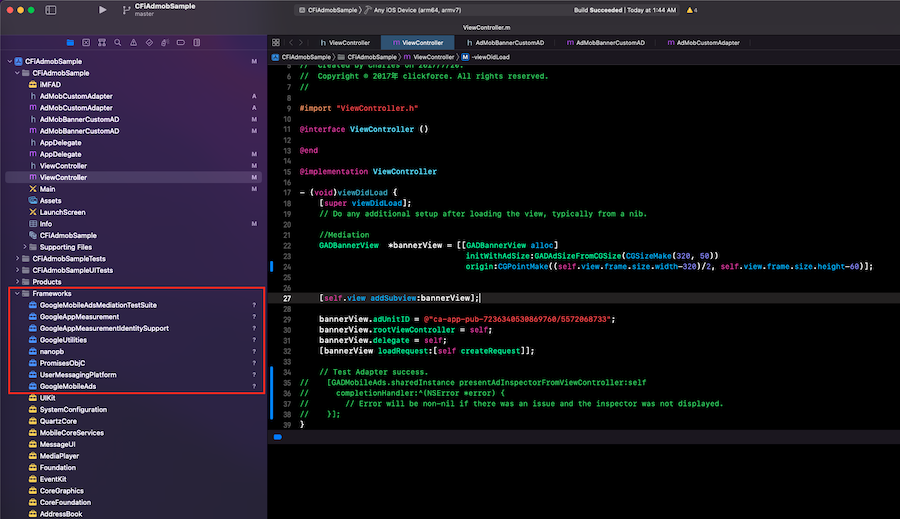
以下程式碼會在 viewController的 viewDidLoad 初始化步驟中建立橫幅廣告(Banner)。
import UIKit
import GoogleMobileAds
class ViewController: UIViewController {
  var bannerView:GADBannerView!

  override func viewDidLoad() {
	super.viewDidLoad()
	// Do any additional setup after loading the view.


	bannerView = GADBannerView.init(adSize: kGADAdSizeBanner,
					origin: CGPoint(x: (self.view.frame.size.width - 320) / 2,
							y: self.view.frame.height-50))
	self.view.addSubview(bannerView)

	bannerView.adUnitID = "ca-app-pub-XXXXXXXXXXXXXXXX/XXXXXXXXXX"
	bannerView.rootViewController = self
	bannerView.delegate = self

	let req = GADRequest()
//        GADMobileAds.sharedInstance().requestConfiguration.testDeviceIdentifiers = [GADSimulatorID];

	bannerView.load(req)
   }
}

extension ViewController:GADBannerViewDelegate{
    func adViewDidReceiveAd(_ bannerView: GADBannerView) {
        print("adViewDidReceiveAd")
    }
    func bannerViewWillPresentScreen(_ bannerView: GADBannerView) {
        print("adViewWillPresentScreen")
    }
    func bannerViewDidDismissScreen(_ bannerView: GADBannerView) {
        print("adViewDidDismissScreen")
    }
    func bannerViewWillDismissScreen(_ bannerView: GADBannerView) {
        print("adViewWillDismissScreen")
    }
    func adViewWillLeaveApplication(_ bannerView: GADBannerView) {
        print("adViewWillLeaveApplication")
    }
}
取得結果

宣告及引入
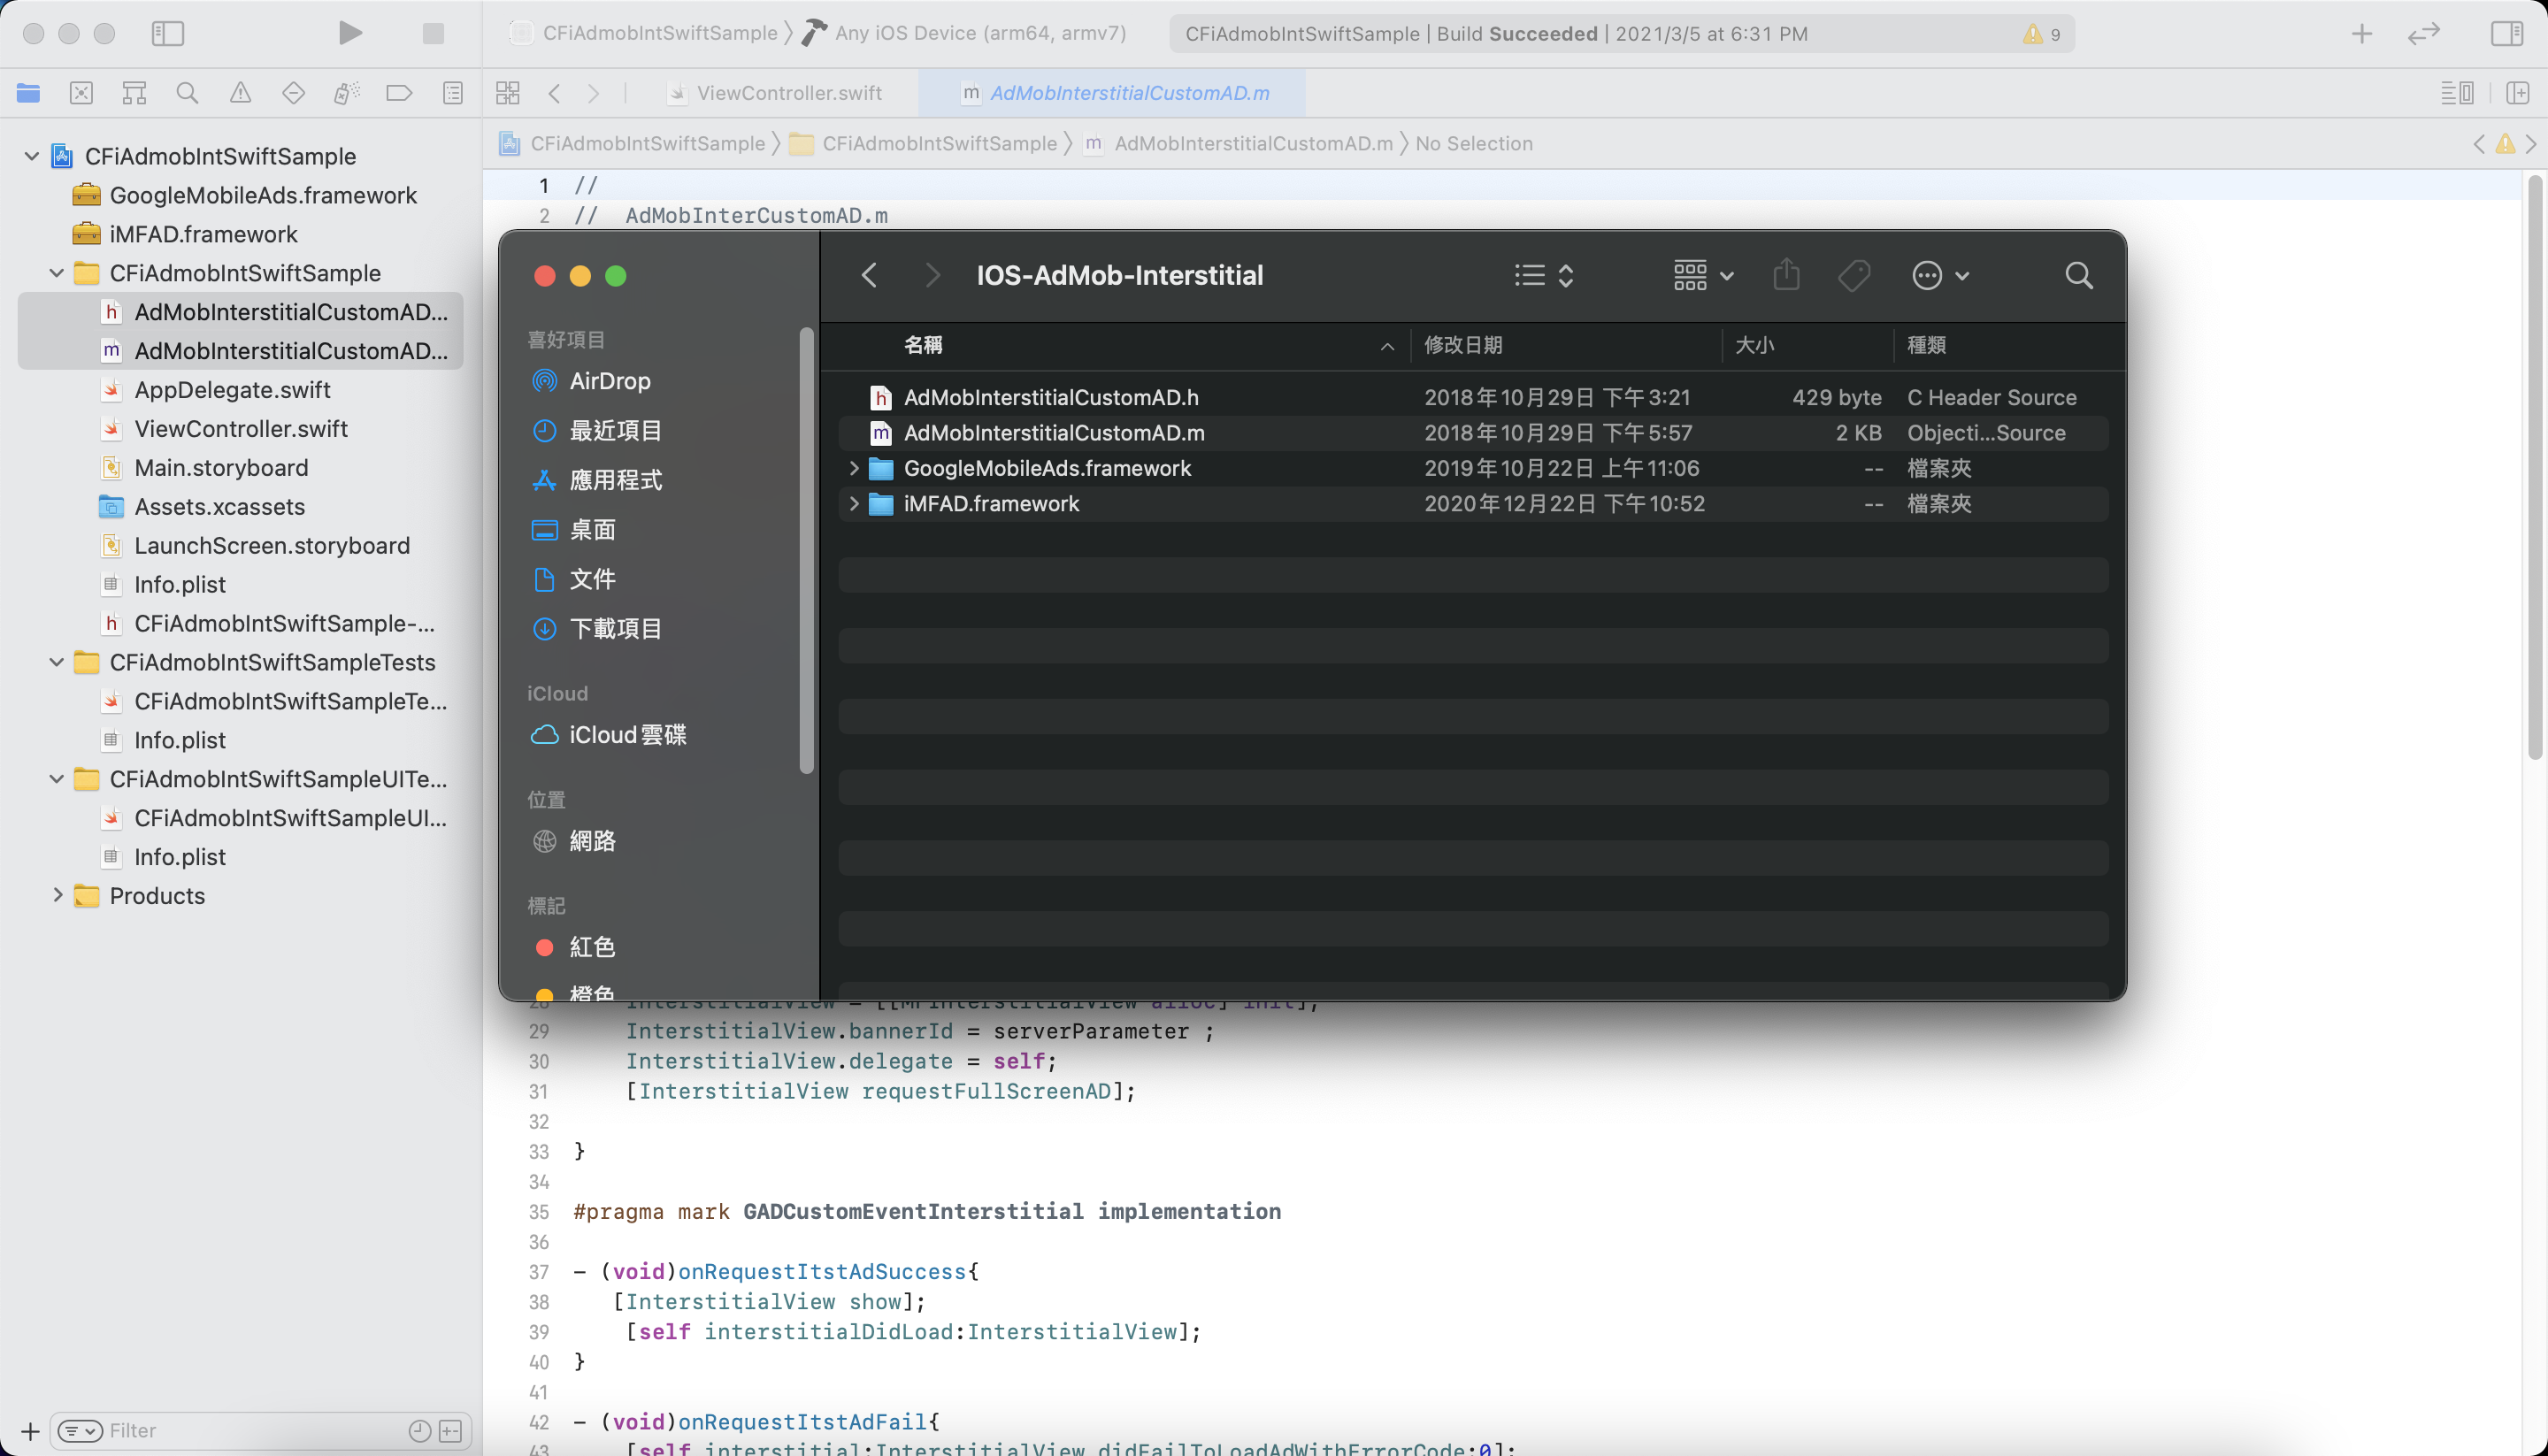
1.依照在AdMob平台上所設定的Class 名稱,將該同名Class引入至專案。 (該Class在IOS-AdMob-Interstitial壓縮包中)
2.加入程式碼
請在需要引入廣告的地方加入import GoogleMobileAds ,並加入GADInterstitialDelegate
import UIKit
import GoogleMobileAds
class ViewController: UIViewController {

    override func viewDidLoad() {
        super.viewDidLoad()
        // Do any additional setup after loading the view.

    }

}

extension ViewController:GADInterstitialDelegate{

}
以下程式碼會在 viewController的 viewDidLoad 初始化步驟中建立插頁廣告(Interstitial)。
import UIKit
import GoogleMobileAds
class ViewController: UIViewController {

   var interstitial:GADInterstitial!

   override func viewDidLoad() {
	super.viewDidLoad()
	// Do any additional setup after loading the view.
	interstitial = GADInterstitial.init(adUnitID: "ca-app-pub-XXXXXXXXXXXXXXXX/XXXXXXXXXX")
	interstitial.delegate = self
	let req = GADRequest()
//        req.testDevices = [""]

	interstitial.load(req)
   }
}

extension ViewController:GADInterstitialDelegate{
    func interstitialDidReceiveAd(_ ad: GADInterstitial) {
        interstitial.present(fromRootViewController: self)
   }
}
取得結果

宣告及引入
1.依照在AdMob平台上所設定的Class 名稱,將該同名Class引入至專案。 (該Class在IOS-AdMob-Native壓縮包中)
2.加入程式碼
請在需要引入廣告的地方加入import GoogleMobileAds and GADNativeAdDelegate、GADAdLoaderDelegate、GADNativeAdLoaderDelegate
import UIKit
import GoogleMobileAds

class ViewController: UIViewController, GADNativeAdDelegate{

   override func viewDidLoad() {
	super.viewDidLoad()

   }

}

extension ViewController:GADAdLoaderDelegate{

}

extension ViewController:GADNativeAdLoaderDelegate{

}
以下程式碼會在 viewController的 viewDidLoad 初始化步驟中建立原生廣告(Native)。
import UIKit
import GoogleMobileAds

class ViewController: UIViewController, GADNativeAdDelegate{


  var ClickforceTestAdUnit = "ca-app-pub-XXXXXXXXXXXXXXXX/XXXXXXXXXX"
  var nativeAdview = GADNativeAdView()
  var iconView = UIImageView()
  var Adtittle = UILabel()
  var Advertiser = UILabel()
  var Adbody = UILabel()
  var mediaView = GADMediaView()
  var Adbutton = UIButton()
  var heightConstraint: NSLayoutConstraint?
  var adLoader:GADAdLoader!


  override func viewDidLoad() {
	  super.viewDidLoad()
	  nativeAdview.removeFromSuperview()
	  self.setAdview()

	  let videoOptions = GADVideoOptions()
	  videoOptions.startMuted = true

	  adLoader = GADAdLoader(adUnitID: ClickforceTestAdUnit,
	  			 rootViewController: self,
				 adTypes: [GADAdLoaderAdType.native],
				 options: [videoOptions])
	  adLoader.delegate = self
	  let req = GADRequest()
//        req.testDevices = [""]
	  adLoader.load(req)
  }

   public func setAdview(){
	   nativeAdview.frame = CGRect(x: 0, y: 50, width: 359, height: 300)

	   iconView.frame = CGRect(x: 15, y: 15, width: 40, height: 40)
	   Adtittle.frame = CGRect(x: 57, y: 15, width: 285, height: 20)
	   Advertiser.frame = CGRect(x: 57, y: 38, width: 285, height: 17)
	   Adbody.frame = CGRect(x: 15, y: 63, width: 330, height: 33)
	   mediaView.frame = CGRect(x: 65, y: 102, width: 250, height: 150)
	   Adbutton.frame = CGRect(x: 260, y: 260, width: 80, height: 34)
	   Adbutton.isUserInteractionEnabled = false

	   nativeAdview.addSubview(Adtittle)
	   nativeAdview.addSubview(iconView)
	   nativeAdview.addSubview(Advertiser)
	   nativeAdview.addSubview(Adbody)
	   nativeAdview.addSubview(mediaView)
	   nativeAdview.addSubview(Adbutton)
	   self.view.addSubview(nativeAdview)

	   nativeAdview.headlineView = Adtittle;
	   nativeAdview.iconView = iconView;
	   nativeAdview.advertiserView = Advertiser;
	   nativeAdview.bodyView = Adbody;
	   nativeAdview.mediaView = mediaView;
	   nativeAdview.callToActionView = Adbutton;
   }
}

extension ViewController:GADAdLoaderDelegate{
   func adLoader(_ adLoader: GADAdLoader, didFailToReceiveAdWithError error: GADRequestError) {

   }

}

extension ViewController:GADNativeAdLoaderDelegate{
   func adLoader(_ adLoader: GADAdLoader, didReceive nativeAd: GADNativeAd) {
	   let native = nativeAdview

	   heightConstraint?.isActive = true

	   native.nativeAd = nativeAd;

	   nativeAd.delegate = self;

	   (native.headlineView as? UILabel)?.text = nativeAd.headline
	   native.headlineView?.isHidden = nativeAd.headline == nil

	   native.mediaView?.mediaContent = nativeAd.mediaContent;

	   (native.bodyView as? UILabel)?.text = nativeAd.body
	   native.bodyView?.isHidden = nativeAd.body == nil

	   (native.iconView as? UIImageView)?.image = nativeAd.icon?.image
	   native.iconView?.isHidden = nativeAd.icon == nil

	   (native.advertiserView as? UILabel)?.text = nativeAd.advertiser
	   native.advertiserView?.isHidden = nativeAd.advertiser == nil

	   (native.callToActionView as? UIButton)?.setTitle(nativeAd.callToAction, for:.normal)
	   (native.callToActionView as? UIButton)?.setTitleColor(.blue, for: .normal)
	   native.callToActionView?.isHidden = nativeAd.callToAction == nil

	   print("Native adapter class name:", nativeAd.responseInfo.adNetworkClassName);//Check the value of adNetworkClassName

	}
   func nativeAdDidRecordImpression(_ nativeAd: GADNativeAd) {
	   print("nativeAdDidRecordImpression")
   }

   func nativeAdDidRecordClick(_ nativeAd: GADNativeAd) {
	   print("nativeAdDidRecordClick")
   }


}
取得結果

show date