SDK導入說明
加入ClickForce Pre-Roll 廣告前,需先下載Android SDK檔案,即進行解壓縮程序,包含了一個jar檔,並完成以下前置步驟:
A.在本Pre Roll 廣告專案中加入 MFAD-*.*.*.jar
B.加入Google Play Service
C.加入IMA Android SDK
D.設定AndroidManifest.xml
E.設定 layout xml
基本設定
引入SDK
在 Android Studio 專案中加入 MFAD-*.*.*.jar
複製解壓縮的 JAR 檔貼上到 libs 資料夾
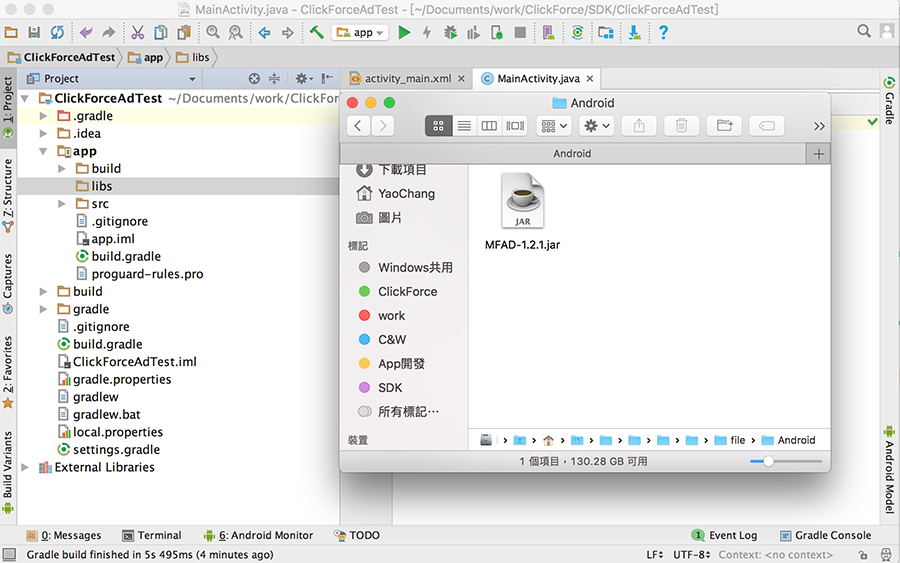
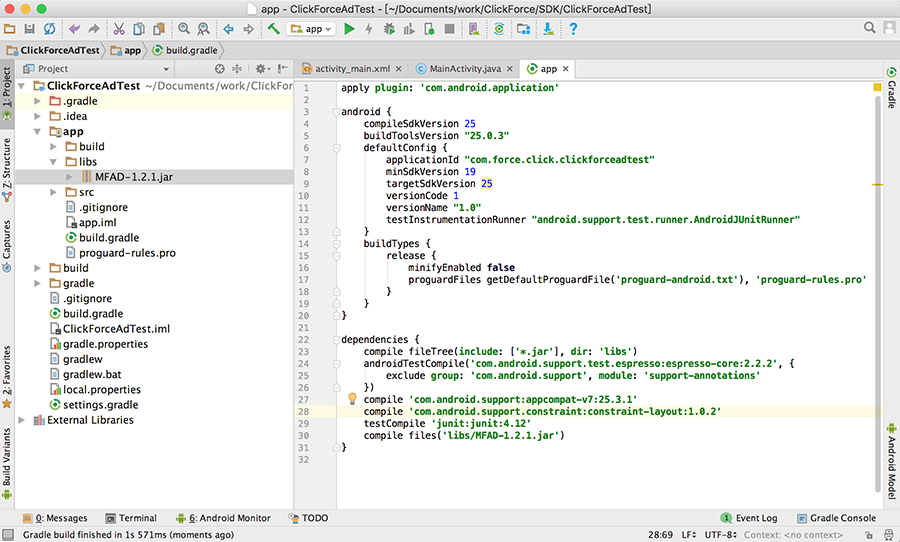
回到 Android 專案,libs 會多出一個 JAR 檔案,對它按下右鍵選擇Add as library 。之後可至 build.gradle 確認是否有加入成功。
如範例顯示,將會有一行 compile files(‘libs/MFAD-*.*.*.jar’) 表示 JAR 被讀到了
加入Google Play Service Ads Identifier
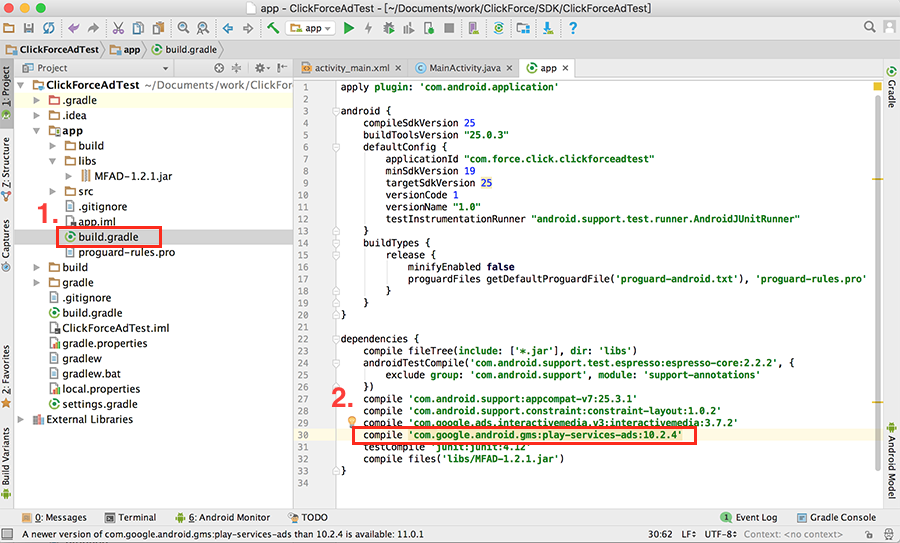
Note: 可查看 Setting Up Google Play Services,瞭解如何設定 Google Play Services SDK。 建議使用最新版Google Play Services,以支援所有功能。
1.加進參考 Google Play 服務版本的 <meta-data> 代碼,Android 可藉此瞭解應用程式預期要用的服務版本。
2.由於SDK使用到 org.apache.http.legacy的library,而Google將該庫已從bootclasspath中刪除,所以加入<uses-library android:name="org.apache.http.legacy" android:required="false"/>
Note: 可查看 Google Developer Settings For Apach HTTP,瞭解第三點設定。 建議使用最新版Google Play Services,以支援所有功能。
   <application
        android:allowBackup="true "
        android:icon="@mipmap/ic_launcher "
        android:label="@string/app_name "
        android:roundIcon="@mipmap/ic_launcher_round "
        android:supportsRtl="true "
        android:theme="@style/AppTheme ">
        <activity android:name=".MainActivity ">
            <intent-filter>
                <action android:name="android.intent.action.MAIN " />

                <category android:name="android.intent.category.LAUNCHER " />
            </intent-filter>
       </activity>
	<uses-library android:name="org.apache.http.legacy" android:required="false"/>
    </application>
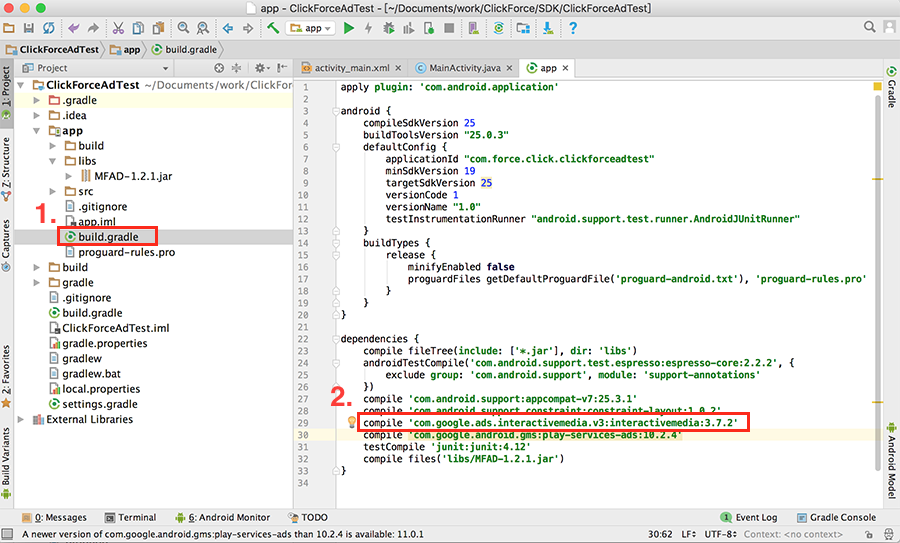
加入IMA Android SDK
設定AndroidManifest.xml
INTERNET必要。用來存取網路,以發出廣告請求。
ACCESS_WIFI_STATE必要。允許訪問Wi-Fi網路狀態信息。
ACCESS_NETWORK_STATE必要。用來在發出廣告請求前,先行檢查是否有可用的網路連結。
AD_ID必要。允許存取廣告識別碼(ADID)。
加入至 AndroidManifest.xml 中
    <uses-permission android:name="android.permission.INTERNET" />
    <uses-permission android:name="android.permission.ACCESS_NETWORK_STATE" />
    <uses-permission android:name="android.permission.ACCESS_WIFI_STATE" />
    <uses-permission android:name="com.google.android.gms.permission.AD_ID" />  (注意:版本修改使用此方法)
android:configChanges="orientation|screenSize"加入 android:configChanges 可以讓系統知道我們想要自行處理特定 configuration 的狀態改變,當狀態改變時,activity 會持續運作
加入至 AndroidManifest.xml 中
 <activity android:name=".MainActivity"
            android:configChanges="orientation|screenSize" >
            <intent-filter>
                <action android:name="android.intent.action.MAIN" />

                <category android:name="android.intent.category.LAUNCHER" />
            </intent-filter>
 </activity>
設定 layout xml
使用Pre Roll 廣告 ,必需在放置廣告頁面的layout xml 中,加入clickforce.ad.PreRollAdView
  <com.clickforce.ad.PreRollAdView
     android:id="@+id/preroll"
     android:layout_width="match_parent"
     android:layout_height="match_parent"
     android:layout_alignParentBottom="true"
     android:layout_centerHorizontal="true">
  </com.clickforce.ad.PreRollAdView>
開始建立 Pre Roll 廣告
PreRollAdView 參數設定與說明
*目前Android版PreRoll只提供全屏播放模式
* 以下必須使用方法
設定廣告板位ID
Parameters
設定Pre Roll 廣告載入
Parameters
設定全屏播放模式
Parameters
自行處理設定變更
須將上面全屏方法在onConfigurationChanged()方法上實作
  @Override
    public void onConfigurationChanged(Configuration newConfig) {

        super.onConfigurationChanged(newConfig);

        preRollAdView.fullScreen(this);

    }
Note: 可查看 Android Developer 了解 onConfigurationChanged() 前往
* 以下為選擇使用方法
設定是否使用控制聲音功能,填入true / false (未使用該方法則預設為false,靜音)
Parameters
設定Pre Roll 關閉廣告
PreRollViewLinstener 說明
  //Pre-roll Vast影片播完處理
 public void onStartPlayVideo(){
 }

 //Pre-roll Vast影片發生錯誤處理
 public void onFailedToPreRollAd(){
 }
宣告及引入
加入Pre Roll 廣告會用到程式碼如下:
public class MainActivity extends Activity {
    private PreRollAdView preRollAdView;

    @Override
    protected void onCreate(Bundle savedInstanceState) {
        super.onCreate(savedInstanceState);
        setContentView(R.layout.activity_main);


        preRollAdView = (PreRollAdView) this.findViewById(R.id.preroll);
        preRollAdView.setAdTagUrl(String.valueOf("4397"));
        preRollAdView.setAdPlay(this);
        preRollAdView.setIsVolume(true);

        preRollAdView.setOnPreRollViewLoaded(new PreRollViewLinstener() {
            @Override
            public void onStartPlayVideo() {
                Log.d("CF","play");
            }

            @Override
            public void onFailedToPreRollAd() {

            }
        });

    }
    @Override
    public void onConfigurationChanged(Configuration newConfig) {

        super.onConfigurationChanged(newConfig);

        preRollAdView.fullScreen(this);

    }
}
取得結果

show date
 Android Pre-Roll 廣告