SDK導入說明
加入ClickForce原生廣告前,需先下載Android SDK檔案,即進行解壓縮程序,包含了一個jar檔,並完成以下前置步驟:
A.在本原生廣告專案中加入 MFAD-*.*.*.jar
B.加入Google Play Service
C.設定AndroidManifest.xml
D.設定 原生廣告 UI layout xml
基本設定
引入SDK
在 Android Studio 專案中加入 MFAD-*.*.*.jar
1. 複製解壓縮的 JAR 檔貼上到 libs 資料夾
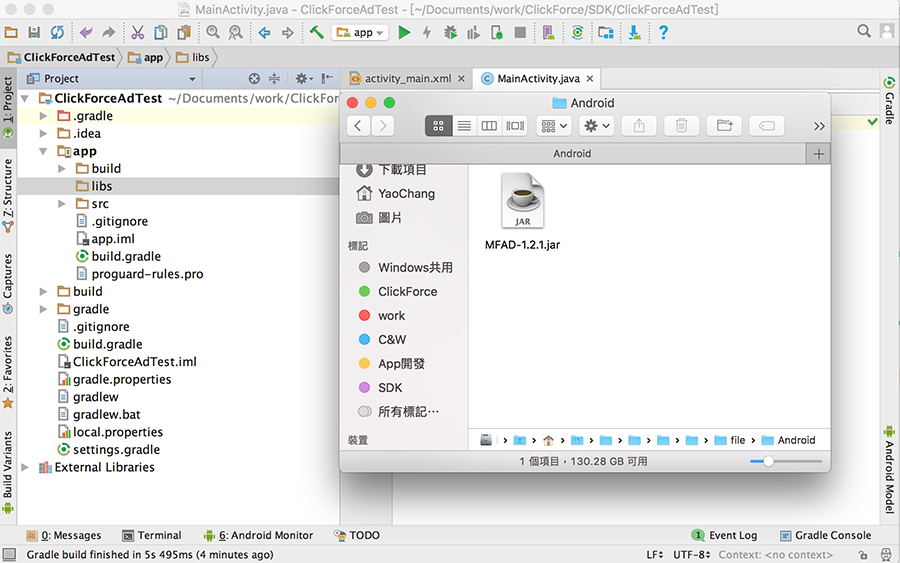
2. 回到 Android 專案,libs 會多出一個 JAR 檔案,對它按下右鍵選擇Add as library 。之後可至 build.gradle 確認是否有加入成功。
如範例顯示,將會有一行 compile files(‘libs/MFAD-*.*.*.jar’) 表示 JAR 被讀到了
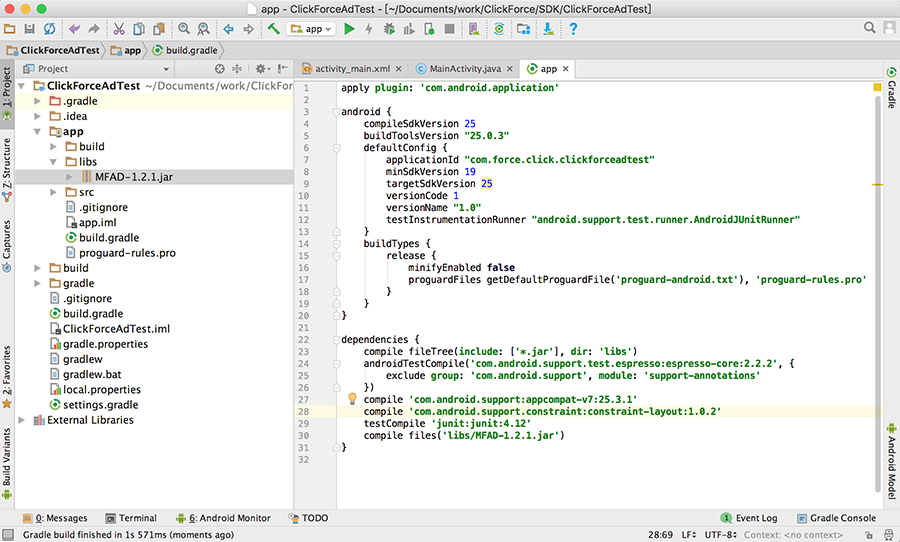
於 build.gradle 加入SDK
Google Play Service
圖片處理
在 Android Studio 專案層級的 build.gradle 中,加入Google Mobile Ads SDK。並請加入maven指令。
        .
        .
        ..
        ...
        versionName "1.0"
        testInstrumentationRunner "android.support.test.runner.AndroidJUnitRunner"
    }
    buildTypes {
        release {
            minifyEnabled false
            proguardFiles getDefaultProguardFile('proguard-android.txt'), 'proguard-rules.pro'
        }
    }
}

allprojects {
    repositories {
        jcenter()
        maven {
            url "https://maven.google.com"
        }
    }
}

dependencies {
    compile fileTree(include: ['*.jar'], dir: 'libs')
    androidTestCompile('com.android.support.test.espresso:espresso-core:2.2.2', {
        exclude group: 'com.android.support', module: 'support-annotations'
    })
    compile 'com.android.support:appcompat-v7:25.3.1'
    compile 'com.android.support.constraint:constraint-layout:1.0.2'
    compile 'com.google.android.gms:play-services-ads:17.2.0'
    compile 'com.koushikdutta.ion:ion:2.+'
    testCompile 'junit:junit:4.12'
    implementation files('libs/MFAD-2.0.4.jar')
}
Note: 可查看 Setting Up Google Play Services,瞭解如何設定 Google Play Services SDK。 建議使用最新版Google Play Services,以支援所有功能。
設定AndroidManifest.xml
INTERNET必要。用來存取網路,以發出廣告請求。
ACCESS_WIFI_STATE必要。允許訪問Wi-Fi網路狀態信息。
ACCESS_NETWORK_STATE必要。用來在發出廣告請求前,先行檢查是否有可用的網路連結。
ACCESS_COARSE_LOCATION必要。允許訪問粗略性位置,以取得地理相關的廣告。
加入至 AndroidManifest.xml 中
    <uses-permission android:name="android.permission.INTERNET" />
    <uses-permission android:name="android.permission.ACCESS_NETWORK_STATE" />
    <uses-permission android:name="android.permission.ACCESS_WIFI_STATE" />
    <uses-permission android:name="android.permission.ACCESS_FINE_LOCATION" />
由於Google Play Services 17.0.0 開始需在 <meta-data> 代碼裡加上 AD_MANAGER_APP,如下圖第二段 meat 代碼內。
   <application
        android:allowBackup="true "
        android:icon="@mipmap/ic_launcher "
        android:label="@string/app_name "
        android:roundIcon="@mipmap/ic_launcher_round "
        android:supportsRtl="true "
        android:theme="@style/AppTheme ">
        <activity android:name=".MainActivity ">
            <intent-filter>
                <action android:name="android.intent.action.MAIN " />

                <category android:name="android.intent.category.LAUNCHER " />
            </intent-filter>
       </activity>
	<meta-data
	   android:name="com.google.android.gms.version"
	   android:value="@integer/google_play_services_version"/>
	<meta-data
	   android:name="com.google.android.gms.ads.AD_MANAGER_APP"
	   android:value="true" />
    </application>
加進參考 Google Play 服務版本的 <meta-data> 代碼,Android 可藉此瞭解應用程式預期要用的服務版本。
   <application
        android:allowBackup="true"
        android:icon="@mipmap/ic_launcher"
        android:label="@string/app_name"
        android:roundIcon="@mipmap/ic_launcher_round"
        android:supportsRtl="true"
        android:theme="@style/AppTheme">
        <activity android:name=".MainActivity">
            <intent-filter>
                <action android:name="android.intent.action.MAIN" />

                <category android:name="android.intent.category.LAUNCHER" />
            </intent-filter>
       </activity>
       <meta-data
           android:name="com.google.android.gms.version"
           android:value="@integer/google_play_services_version"/>
    </application>
ACCESS_FINE_LOCATION選用。允許訪問精準性定位,以提供更精準的定位取得地理相關的廣告。
WAKE_LOCK選用。
WRITE_EXTERNAL_STORAGE選用。允許寫入外部儲存裝置,與其他權限互相搭配,以取得更多樣性互動的廣告。
CALL_PHONE選用。用來發出打電話請求,提供使用者更多的廣告資訊。
加入至 AndroidManifest.xml 中
    <uses-permission android:name="android.permission.ACCESS_FINE_LOCATION" />
    <uses-permission android:name="android.permission.WAKE_LOCK" />
    <uses-permission android:name="android.permission.WRITE_EXTERNAL_STORAGE" />
    <uses-permission android:name="android.permission.CALL_PHONE" />
原生廣告版面配置
設定 layout xml
在 Activity 的版面配置中,新增原生廣告的容器。
<?xml version="1.0" encoding="utf-8"?>
<RelativeLayout xmlns:android="http://schemas.android.com/apk/res/android"
    xmlns:app="http://schemas.android.com/apk/res-auto"
    xmlns:tools="http://schemas.android.com/tools"
    android:layout_width="match_parent"
    android:layout_height="match_parent"
    tools:context="com.example.cf.cfanativesample.MainActivity">

    <LinearLayout
        android:id="@+id/native_ad_container"
        android:layout_width="250dp"
        android:layout_height="wrap_content"
        android:orientation="vertical"/>


</RelativeLayout>
建立原生廣告的自訂版面配置
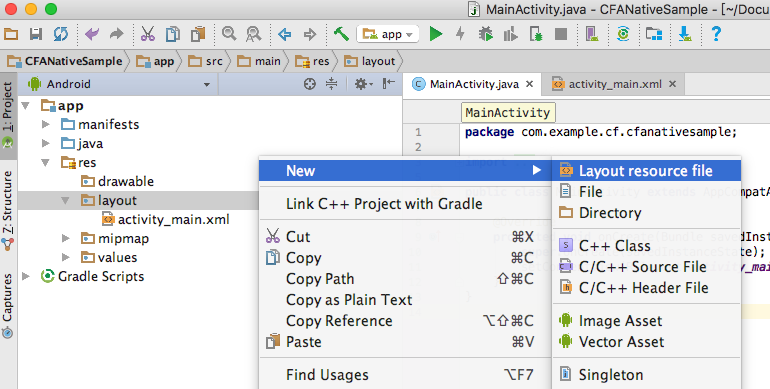
原生廣告有三個 <TextView> 、 一個 <Button> 、 一個 <ImageView> 這五個元件組成
使用者可利用下面範例程式碼,將五個元件任意組合想要的廣告方式,另外 位置擺放、圖片大小、文字大小 都可以自行變更。
以下是原生廣告自訂版面配置的範例(一):
  <?xml version="1.0" encoding="utf-8"?>
<LinearLayout xmlns:android="http://schemas.android.com/apk/res/android"
    xmlns:app="http://schemas.android.com/apk/res-auto"
    android:orientation="vertical" android:layout_width="match_parent"
    android:layout_height="match_parent">


    <LinearLayout
        android:layout_width="match_parent"
        android:layout_height="wrap_content"
        android:orientation="horizontal">

        <ImageView
            android:id="@+id/native_ad_coverimage"
            android:layout_width="121dp"
            android:layout_height="81dp" />

        <LinearLayout
            android:layout_width="match_parent"
            android:layout_height="wrap_content"
            android:orientation="vertical">

            <TextView
                android:id="@+id/native_ad_title"
                android:layout_width="match_parent"
                android:layout_height="wrap_content"
                android:lines="1"
                android:text="TextView"
                android:textStyle="bold"
                android:textSize="20sp" />

            <TextView
                android:id="@+id/native_ad_content"
                android:layout_width="match_parent"
                android:layout_height="wrap_content"
                android:lines="3"
                android:text="TextView"
                android:textSize="15sp" />

        </LinearLayout>


    </LinearLayout>

    <LinearLayout
        android:layout_width="match_parent"
        android:layout_height="wrap_content"
        android:orientation="horizontal">

        <TextView
            android:id="@+id/native_ad_advertiser"
            android:layout_width="match_parent"
            android:layout_height="wrap_content"
            android:layout_weight="1"
            android:text="TextView" />

        <Button
            android:id="@+id/native_ad_buttonText"
            android:layout_width="match_parent"
            android:layout_height="wrap_content"
            android:layout_weight="1"
            android:text="Button" />
    </LinearLayout>

</LinearLayout>
以下是原生廣告自訂版面配置的範例(二):
    <?xml version="1.0" encoding="utf-8"?>
    <LinearLayout xmlns:android="http://schemas.android.com/apk/res/android"
        android:orientation="vertical" android:layout_width="match_parent"
        android:layout_height="match_parent">


        <LinearLayout
            android:layout_width="match_parent"
            android:layout_height="wrap_content"
            android:orientation="vertical">

            <LinearLayout
                android:layout_width="match_parent"
                android:layout_height="wrap_content"
                android:orientation="horizontal">

                <TextView
                    android:id="@+id/native_ad_title"
                    android:layout_width="match_parent"
                    android:layout_height="wrap_content"
                    android:layout_weight="1"
                    android:layout_gravity="center"
                    android:lines="2"
                    android:text="TextView"
                    android:textStyle="bold"
                    android:textSize="20sp" />

                <Button
                    android:id="@+id/native_ad_buttonText"
                    android:layout_width="match_parent"
                    android:layout_height="wrap_content"
                    android:layout_weight="3"
                    android:text="Button" />

            </LinearLayout>

            <LinearLayout
                android:layout_width="match_parent"
                android:layout_height="wrap_content"
                android:layout_weight="2"
                android:orientation="vertical">

                <TextView
                    android:id="@+id/native_ad_content"
                    android:layout_width="match_parent"
                    android:layout_height="match_parent"
                    android:layout_weight="1"
                    android:lines="3"
                    android:text="TextView"
                    android:textSize="15sp" />

                <TextView
                    android:id="@+id/native_ad_advertiser"
                    android:layout_width="match_parent"
                    android:layout_height="wrap_content"
                    android:text="TextView" />

            </LinearLayout>

            <ImageView
                android:id="@+id/native_ad_coverimage"
                android:layout_gravity="center_horizontal"
                android:layout_width="300dp"
                android:layout_height="200dp" />

        </LinearLayout>

    </LinearLayout>
開始建立 原生廣告
NativeAd 屬性方法設定與說明
開始請求廣告
public void setAdID(String zoneID)
Parameters
設定廣告板位ID
設定Listener
public void setOnNativeListener(AdNativeListener listener)
Parameters
* 以下為選擇使用方法
NativeAd 屬性說明
設定是否輸出除錯(debug)訊息 : (true / false)
AdNativeListener 說明
    @Override
    public void onNativeAdResult(NativeAd nativeAd) {
       //請求廣告成功,並將原生廣載入至對應UI元件
    }

    @Override
    public void onNativeAdClick(){
       //點擊廣告
    }

    @Override
    public void onNativeAdOnFailed(){
       //請求廣告失敗,未顯示廣告
    }
設定點擊範圍
public void registerViewForInteraction(View container, Listlist)
Parameters
Parameters
宣告及引入
加入原生廣告會用到程式碼如下:
package com.example.cf.cfanativesample; import android.content.Context; .... public class MainActivity extends AppCompatActivity { private CFNativeAd nativeAd; private LinearLayout adView; private Context context = this; @Override protected void onCreate(Bundle savedInstanceState) { super.onCreate(savedInstanceState); setContentView(R.layout.activity_main); nativeAd = new CFNativeAd(this); nativeAd.setAdID("5229"); nativeAd.setOnNativeListener(new AdNativeListener() { @Override public void onNativeAdResult(NativeAd nativeAd) { LinearLayout adContainer = (LinearLayout)findViewById(R.id.native_ad_container); LayoutInflater inflater = LayoutInflater.from(context); adView = (LinearLayout)inflater.inflate(R.layout.native_ad_layout,adContainer,false); adContainer.addView(adView); TextView nativeAdTitle = (TextView)adView.findViewById(R.id.native_ad_title); TextView nativeAdContent = (TextView)adView.findViewById(R.id.native_ad_content); TextView nativeAdvertiser = (TextView)adView.findViewById(R.id.native_ad_advertiser); Button nativeAdButtonText = (Button)adView.findViewById(R.id.native_ad_buttonText); ImageView nativeImage = (ImageView)adView.findViewById(R.id.native_ad_coverimage); nativeAdTitle.setText(nativeAd.getAdTitle()); nativeAdContent.setText(nativeAd.getAdContent()); nativeAdvertiser.setText(nativeAd.getAdvertiser()); nativeAdButtonText.setText(nativeAd.getAdButtonText()); nativeAd.downloadAndDisplayImage(nativeAd.getAdCoverImage(),nativeImage); ListclickListView = new ArrayList<>(); clickListView.add(nativeAdTitle); clickListView.add(nativeAdButtonText); cfNativeAd.registerViewForInteraction(adContainer,clickListView); } @Override public void onNativeAdClick() { } @Override public void onNativeAdOnFailed() { } }); } }
取得結果
範例(一):
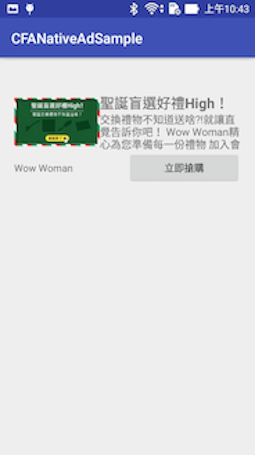
範例(二):
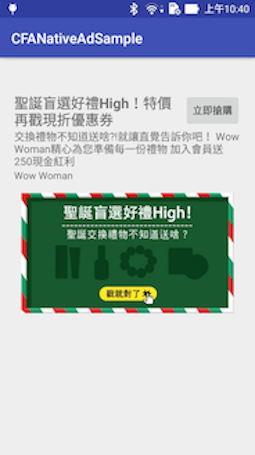
show date
 Android 原生廣告